
The best approach to sibilance would be changes in mic placement and selection during recording. But if you were not the recordist, you may have inherited someone else’s poor choices and get a voice recording where “S” sounds are painfully harsh. If this happens a few times during a recording, applying EQ to only those instances may be a good solution. But if you have consistent sibilance throughout, manually highlighting and EQing each “S” can be time consuming.
Sometimes we magnify the problem: harshness can be exaggerated by extreme compression, in which case backing off may be helpful. Other times a surgical EQ cut on the entire recording may alleviate sibilance without otherwise damaging the sound of the voice. Maybe an adjustment of compression plus an EQ cut does the trick. Never overlook simple solutions like these. But when a raw voice recording sounds obviously sibilant even before you strap a compressor across the channel, you may need a de-esser.
For a voice recording that is sibilant all the way through, there is typically a dominant frequency where the sibilance peaks. Sometimes an RTA is a quick way to visually find this frequency. You can also sweep the 3-12k Hz region with a narrow Q parametric and listen for the offending frequency. Finding a dominant frequency allows you to use it for triggering a de-esser, and may also be used to focus the processing on the appropriate band if the de-esser is capable.

THE FIRST SHALL BE LAST
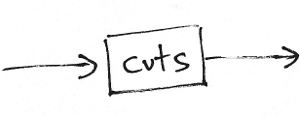
De-essing is one of those processes I like to employ early in the chain. The way I figure it, the sibilance volume is probably more consistent before other processing rather than after. For the same reason, whenever I use a gate plug-in I also tend to insert it immediately following the initial cuts. But I know people who’ve suggested just the opposite, so decide for yourself where in the signal path de-essing, gating, or other miscellaneous functions seem effective to you.
TUNED GAIN REDUCTION
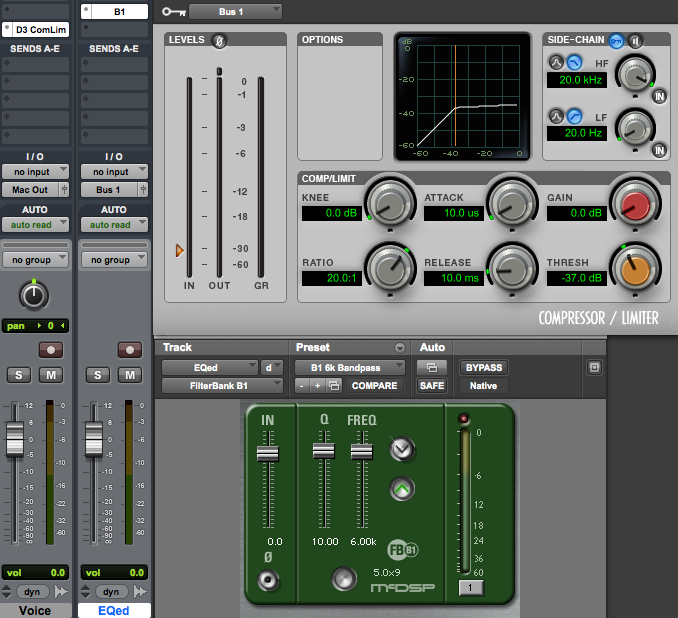
One way to learn how something works is by taking it apart and/or building one. At it’s core a de-esser is a compressor with frequency specific controls. So let’s use an EQ plug-in and a separate compression plug-in to make a basic de-esser. We’ll use different plug-ins on each track, so be sure delay compensation is active.
Click to enlarge
Duplicate the sibilant voice track. Place a compressor with side-chain capability on the first track. Use a narrow bandpass on the second track so that the sibilance is promenant, then buss the output to the side-chain input of the compressor on the first track. Activate the side-chain and set the compressor threshold so that strong sibilance content causes the compressor to clamp down on the voice signal. If the threshold is too high, the sibilance won’t be reduced. If the threshold is too low, the “S” sounds will resemble a lisp; that’s how you know you’ve gone too far. Use quick attack and release times to help keep the compression out of the non-sibilant parts of the signal. A high ratio usually works well.
Congratulations! You just built your own de-esser. Notice a few things:
(1) Gain reduction should be driven by a fairly narrow bandwidth that is “tuned” to the sibilance.
(2) The threshold must be significant enough to reduce some sibilance without sounding lisp-like.
(3) The EQ is not applied to the signal, only the side-chain. So the full bandwidth signal gets reduced when the compressor triggers. Sometimes the quick attack and release settings are not enough to prevent other sounds from being compressed too.
HIGH FREQ GAIN REDUCTION
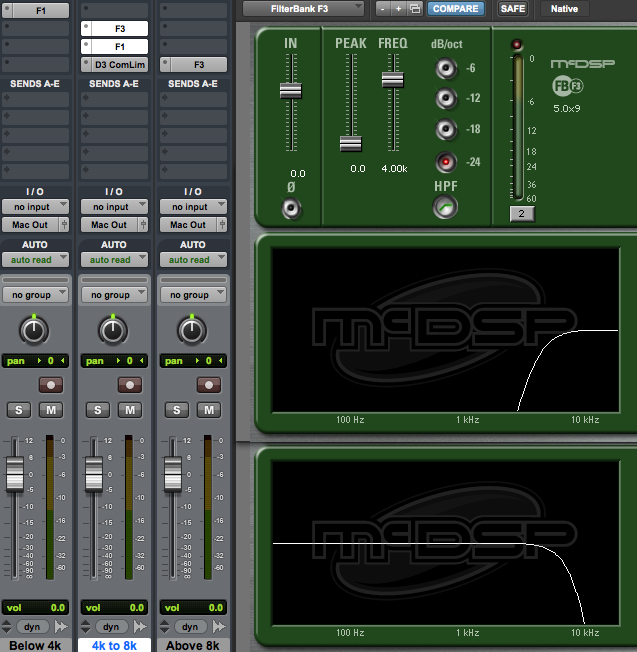
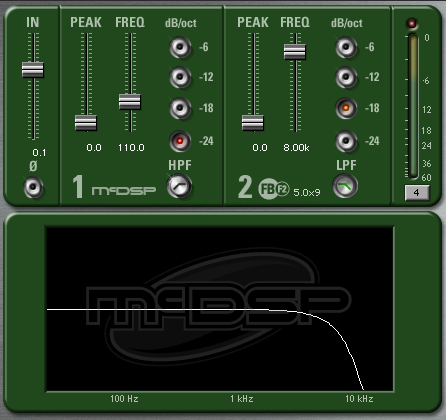
As we have seen, sometimes broadband compression will affect non-sibilance. Let’s consider a more focused version of the de-esser in an attempt to improve performance. This time we separate the high frequencies and subject them only to compression.
Start again with only one vocal track. Make two duplicates; three tracks total. On the first track use a high pass (low rolloff) filter. Set the frequency just below where the sibilance dominates. For example, if the harsh “S” sounds are centered at 6k Hz, then set the high pass on your first track to 4k or 5k Hz. Add a side-chain compressor after the EQ.
On the second track use a low pass (high rolloff) set to the same frequency as track one. This will be the part of the voice that the de-esser does not touch.
On the third track setup your band pass filter, centered on the sibilance. Feed the output of the third track to the side-chain input of the compressor on the first track.

Click to enlarge
This de-esser is a little more complicated, but narrows the focus of the gain reduction. It provides the opportunity to sound more natural. The threshold setting is still important: too little compression and the sibilance will remain, too much and the lisp-like sound results. Many of the de-essers that you can purchase function like this.
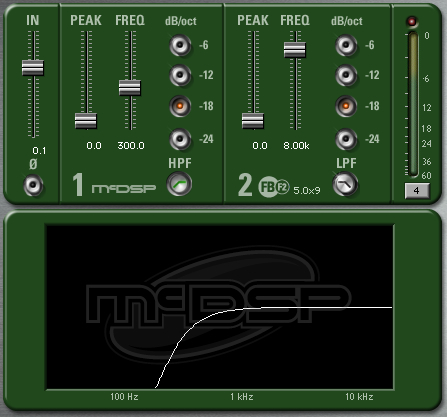
BAND PASS GAIN REDUCTION
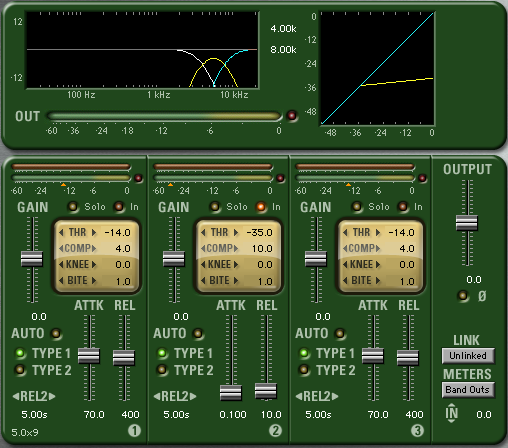
So far both of our DIY de-essers use a bandpass filter to drive the side-chain of a compressor. What if we wanted to compress only that band of sibilance and leave everything below and above it alone? Here’s how to built it:
Start again with only one vocal track. Make two duplicates. Slap a low pass filter (high rolloff) on the first track. This will be all of the voice below the sibilance that we leave alone.
On the second track use a high pass filter set to the same frequency as the first track. Add a low pass filter above it. The low pass and high pass filters combine to make a band pass filter. These two frequencies should be set for the lower and upper limits of the sibilance range that you want to diminish. Now add a compressor. Since the input of the compressor is the sibilance, no need to use a side-chain input. Just compress the sibilance and leave the rest alone.
The third track will need a high pass filter set for the same frequency as the low pass filter on the second track. This will be all of the voice above sibilance that we leave alone.
Click to enlarge
I think it’s worth building all three tracks to really understand how the parts work together to de-ess. Some of the better de-essing processors available for purchase have a similar band pass option.
But now that we’ve built the whole thing, let’s take a short cut with a multi-band compressor. If you simply insert the multi-band compressor on a single track of voice, then define one band’s lower and upper limits like we did the second track above – boom! You’ve essentially created the same de-essing process with a lot less fuss. Leave the other bands inactive and you will only process the sibilance. Most multi-band compressors have presets for de-essing and they could be a good starting point when you’re trying to manage sibilance.
LISTEN
Many dedicated de-essers have a “listen” function that allows you to tune around and listen to the strength of the signal used to activate the gain reduction. This saves time because once you find the harshness, you’ve simultaneously set your de-esser to use it. It can also be more intuitive than looking at an RTA or sweeping and listening to a parametric EQ.
DE-ESSER KUNG FU
The trickiest de-esser I know was originally built into the Empirical Labs Lil Freq, then got it’s own half rack called the DerrEsser. What makes this processor unique is that it not only reacts to the strength of the tuned sibilance band, but it compares it to the audio out of band. All other de-essers can misfire if a signal is simply very loud. If the sibilance band happens to be strong because everything is strong, the threshold may be crossed and the de-esser activates even though there may be no sibilance. The Empirical Labs processor compares the sibilance band to the rest of the signal. If everything is loud, then the relationship of the sibilance band to the rest of the signal is relatively flat. But if a harsh “S” sound comes through, the strength of the sibilance band will be much louder than the rest of the signal. This helps the processor activate only in the presence of sibilance and avoid misfiring any other time. It’s very cleaver and one of the best sounding de-essers I have ever used. The only problem is: both the Lil Freq and DerrEsser and completely analog, so there is no plugin option.
I’ve drawn some pretty elaborate schemes on the backs of envelopes to make my own version of this processor for use In The Box, but had a difficult time using it. The interplay of component parts is complicated. So kudos to Empirical Labs for making a great sounding product, with a simple-to-use interface that’s difficult recreate. I’m holding my breath that they make a digital version (I’ve suggested it to them at trade shows).
A SHOCKINGLY SIMPLE DIY DE-ESSER
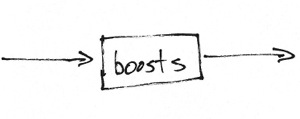
De-esser function is complex, so I decided to save this technique for the end of the article. Because this version is so incredibly simple, it doesn’t break down the process as well. But it’s super fun and anyone with the most basic EQ and compressor can build it. Plus, it can also provide some insights into voice processing chains more generally. Ready? It’s goes like this:
Parametric EQ boost of sibilant frequency range > compressor > reciprocal cut of the boost

Click to enlarge
There is only one channel and you don’t need a side-chain! Yes, this is a functional de-esser and it works. Try it for yourself. Astute observers will point out weaknesses of this design:
(1) Ridiculously strong EQ levels must be used to avoid misfires.
(2) Even the highest quality digital EQ used this severely will probably impart undesirable sonic artifacts.
But now consider a variation on this theme. Take the case of a recording that is sibilant and kind of bright overall. Normally you might decide that a modest EQ cut at the sibilant frequency sounds better than a constantly misfiring de-esser. But if you are also using a compressor on that bright recording, you might want to cut the sibilance after compression because that compressor might dynamically help you manage the harshness (especially if your attack and release times are quick). Or you might intentionally choose a bright microphone to recording someone sibilant, let a compressor react to the harshness, then balance out the brightness with some EQ cuts after compression.
You’re probably better off planning for a good recording than a bright, sibilant one, but you never know when an offbeat idea like this might come in handy. The interplay of EQ and dynamics processors is at the heart of every de-esser, so thinking about them in a larger context of component parts in a signal chain can help us use them more effectively.
All of my screen shots are from ProTools, because that’s what I use. To see examples with other software, and de-esser perspectives from other audio craftsmen, check out:
Jon Tidey – Audio Geek Zine – examples in Reaper
Jon demonstrates four different approaches including screen shots and audio examples.
Joe Gilder – Home Studio Corner – examples in Studio One
Watch and listen to this video where Joe configures a multi-band compressor as a de-esser, and adjusts settings based on what he’s hearing.
Also in this Voice Processing series:
Frequency Cuts
Compression Effects
Compression Technique
Frequency Boosts
Extreme EQ!
Limiting

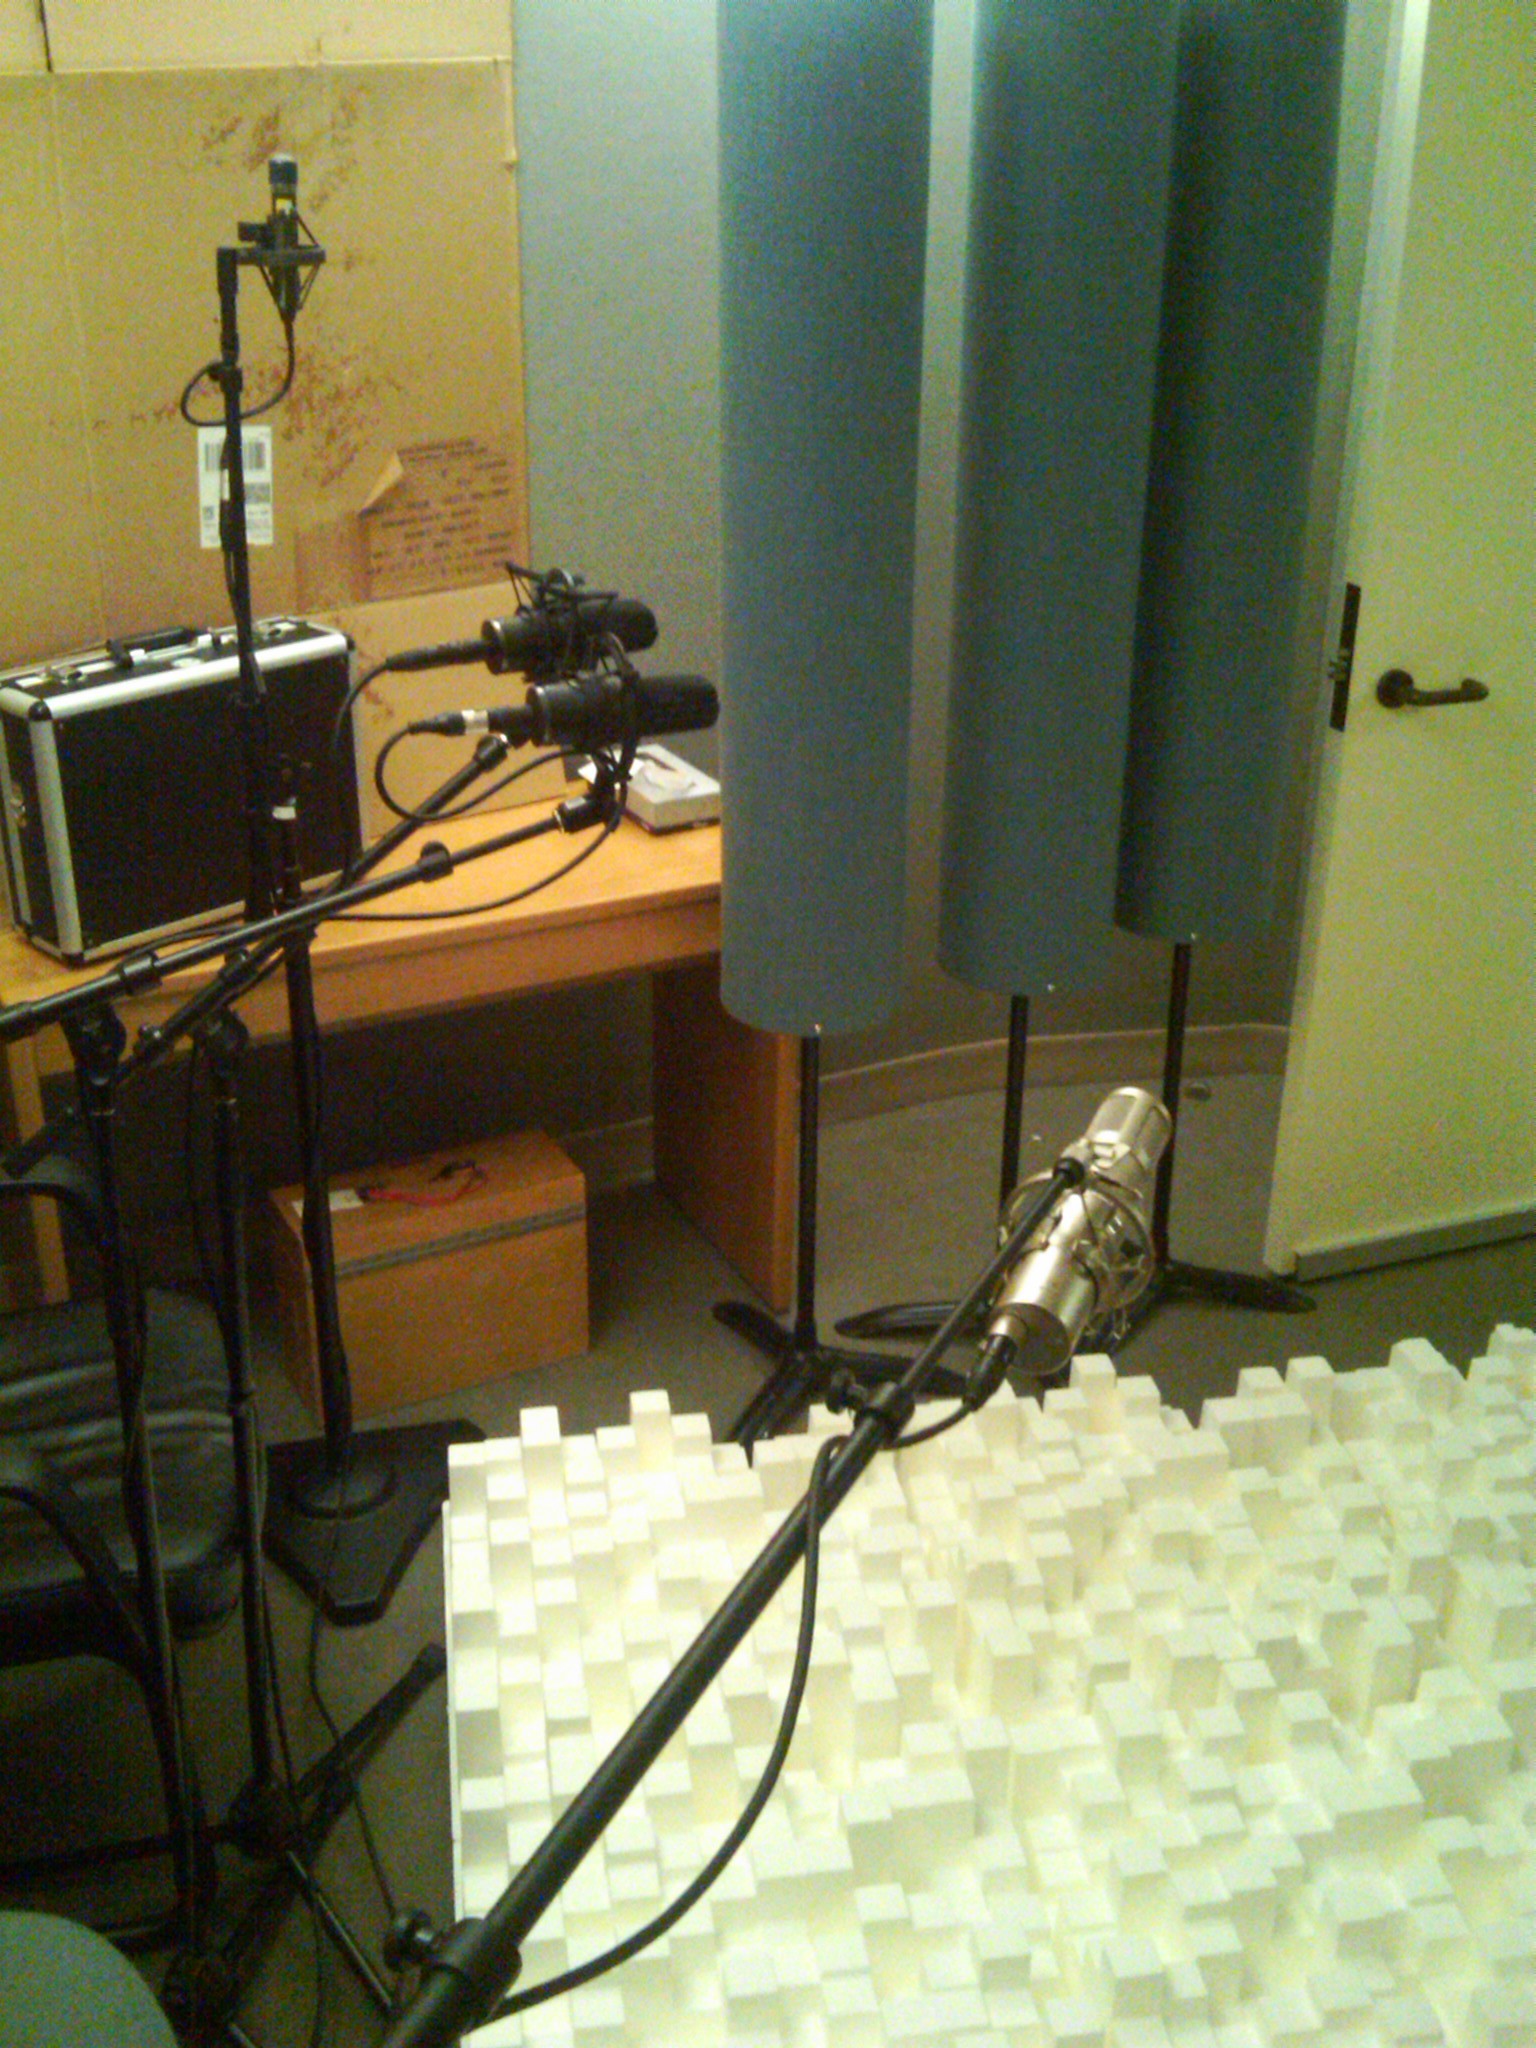
This week we started a new project with these insanely talented people (left to right): Michele Wells, Danna Bremer, Randy Coppinger, Tress MacNeille, and Jonathan Hui.
No, I’m not standing on a box. I’m just freakishly tall.
I appreciate the mentors who helped me when I was coming up in the studio. This summer I plan to pay that forward, which got me to thinking: For someone just getting started, what Ten Basics should s/he learn first? So I started an Audio Fundamentals list. Here’s what I’ve got so far:
01 Listening Skills
02 Basic Acoustics
03 Transducers: Microphones, Speakers, Amplifiers
04 Microphone Placement
05 Analog and Digital Audio: Sampling Theory, Digital Interface, Workstation
06 Noise Floor, Distortion Ceiling, and Gain Staging
07 Digital Audio Editing
08 EQ, Compression, and Effects
09 Signal Flow: Busses, Auxiliary Sends, Returns
10 Mixing: How To Reveal More Than One Sound At A Time
And I really appreciate a list sent by Rene Coronado: patience, persistence, written skills, aesthetic, critical thinking, humility, curiosity, computing and backup skills.
What do you think?
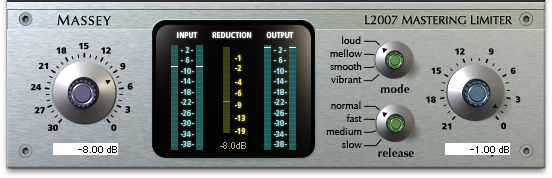
Some people use limiters early in their process. I’m not one of those people. I’ve attempted it a few times, and always found that I prefer to save limiting to the last step. Or occasionally I’ll decide things don’t need any limiting.

For me, bad limiting sounds worse than bad compression. And that’s pretty bad. Over-limited material sounds more amateur, more sonically offensive, than just about any processing mistake that people make. But as often as I hear it, I suppose it doesn’t bother other people as much as it offends me. So if my concerns seem a little dire, feel free to take this article with a grain of salt.
4 dB
I remember when L1 limiters roamed the earth, unchallenged. This was the first serious look-ahead digital limiter for the masses, meaning that the detector had a head start before the gain reduction was activated. As transparent as that sounded, I found that when I pushed the gain reduction more than about 4dB, things sounded crushed and transients lost their impact. Sometimes you could push further, but 4dB was a reliable measure to avoid auditory ugliness.
This forced me to work harder at containing my mixes, finding other ways to communicate apparent loudness instead of just banging up against a limiter. And though some superior limiters followed the L1, I find that my processing for voice over, vocals, or anything else seems more powerful and vibrant when I don’t smash the living daylights out of things with a digital limiter. So I continue to use with caution.
TELL ME THE TRUTH
I believe we use good digital limiters to help increase apparent loudness without otherwise making things sound worse. So if we set the ceiling below 0dB FS, the audio won’t distort… right? Along comes the concept of intersample clipping to make things confusing (and to explain why things sometimes sound bad even if the meter doesn’t show it). Some good advice from Bob Katz, Ian Shepherd, and others has been: stay FAR below 0dB FS. Unless you’ve got a true peak meter. And I’ll take that one level up: unless you’ve got a true peak limiter!
I’ve recently started using Ozone 5, which has both true peak metering and limiting. Now I have to admit that I’m still learning how to wield the limiter well (iZotope stuff is so tweakible). As much as I appreciate knowing exactly what’s going on with the ceiling, making things sound good still requires that I listen. Limiters — just like any other audio tool — should be chosen thoughtfully, should become familiar by repeated use, and should ultimately be judged by how things sound.
Also in this Voice Processing series:
Frequency Cuts
Compression Effects
Compression Technique
Frequency Boosts
Extreme EQ!
De-Ess
Typical EQ discussions look at frequency cuts and boosts intended to bring out desired qualities in the voice. But sometimes there are obnoxious problems that need to be fixed. Or we want to use EQ as an effect. Sounds like a job for extreme EQ manipulation.
KABOOM!
When a performer works too close to the mic, and/or blows a lot of air, plosives may seem more like small nuclear blasts. All of that extra bass sounds unnatural and can be distracting. A severe low rolloff (high pass) filter can often make it sound normal again, but can also make everything else sound thin and terrible. A better solution: EQ only a small portion of the recording, the part where the plosive sounds bass heavy.
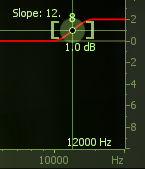
In a DAW, low frequencies appear longer than high ones. Compare what you hear with what you see to help locate just the part of the recording with the explosive sounding plosive. Separate the “pop” from the rest of the voice recording. Select just that part, apply a low roll off at 150 Hz and listen to it. If that kills enough bass to sound natural again, great. But often you will need to undo, set the roll off higher and listen again. Sometimes you can stop at 200 Hz, sometimes 250 Hz, other times you need to go even higher. Steep slopes like 12 and 18dB per octave seem to work well.
Any signal processing has the opportunity to create latency. Filters often change the timing of a recording. This means that once you get the frequency and slope worked out, the processed section of voice may no longer transition smoothly to the surrounding audio. One solution is to process a larger section of audio, cut it back down to a section that fits and slide it into place. A simpler and often quicker solution is to cross fade in and out of the processed section. Experiment with these techniques in conjunction with EQing the overly plosive section of audio and your p-pop elimination kung fu will get better and better the more you try.
Here’s a sweet tutorial for removing plosives in Reaper.
SIBILANCE
When a voice is well recorded, sibilance will have already been avoided through mic selection and placement. If all “s” sounds are harsh, simple EQ may not be a good solution. But sometimes a voice sounds sibilance free most of the time, with occasional harshness. Like occasional plosives, sibilance may be made to sound more natural by selecting only the small portion that sounds bad and EQing that only.
Sweep through the 3-12k Hz region with a narrow Q and a significant boost and listen for sibilance (see Boosts for details). Or have a quick look at an RTA for an obvious peak when you hear sibilance. If you can identify a frequency to cut, doing so may return that “s” sound to something more normal (less distracting). As with plosives, aim your EQ at the part of the recording that is sibilant and leave the rest unaltered. I find a Q of 4 or narrower is needed. The cuts are pretty drastic. Start with 6dB and listen. But there are times when 9dB, 12dB, 15dB or more may be needed to to get things sounding good again.
But if every “s” sound rips out your ears, EQing each one by hand could be a huge time suck. When a recording is consistently sibilant throughout, you may need a de-esser.
A DULL ROAR
Recording on the other side of glass takes some effort. Recording underwater requires even more effort. Both of these can be approximated using extreme EQ. Set a high roll off (low pass) filter at around 8k Hz. Then adjust it lower and try different filter steepnesses until it sounds convincing. Rolling off for glass will be fairly subtle. Under water will be a lot more muffled.
THIN TO WIN
My favorite way to make a voice sound like it is coming from a phone, intercom, toy speaker, megaphone, etc. is to play the voice through the device and re-record it. Nothing is quite as convincing as the real thing. But in a pinch, many of these sounds can be approximated with extreme EQ.
Take a low roll off (high pass) filter and set it higher than you would want for a full sounding, realistic voice. You want to set it higher than 100 Hz. Somewhere just below 200 Hz things start to get weird. And they get weirder the higher you go. Decide for yourself how thin you need to make the voice sound for the effect to be convincing. For a phone you might add some distortion and/or severely lower the bit rate to really sell the idea. For an intercom, try adding a short delay or tight reverb. For a toy speaker go especially high with the roll off and more severe with distortion than for a phone. For a megaphone, make greater use of delay… either louder than you might for an intercom and/or use a longer delay time.
THE NARROW ROAD

Combine high roll off or switch to band pass filter for more vintage phone, intercom, toy, and megaphone effects. You’ll hear very narrow effects like this on some vocals during an intro, bridge, or other low fidelity moments in some songs. If you’re not trying to emulate something in the real world, experiment with really wacky settings and hear what works for your production. You can even automate frequency sweeps using band pass, high pass, or low pass filters to create a sense of motion, revelation, or closure.
Also in this Voice Processing series:
Frequency Cuts
Compression Effects
Compression Technique
Frequency Boosts
Limiting
De-Ess
 The most obvious approach to EQ is push up more of what you want to hear. Getting the right microphone for the voice and recording it well should mean little or no EQ is needed. Or as my friend Khris Brown likes to say about equalizing voice: “less during initial recording.” And if you do need EQ, cut frequencies first, as previously discussed.
But you may not have the luxury of recording the voice, in which case the person who made those choices may not have set you up for success. And let’s face it, we all make mistakes and figure out later that something needs to be brought out with EQ. Don’t resist using an EQ boost based on the lofty ideal that you shouldn’t need it. Do what needs to be done to inspire listeners.
POST COMPRESSION
I seem to boost frequencies after compression, rather than before. Because when I EQ after, boosts work more intuitively. Boosting EQ into compression can make the compressor more responsive to the louder frequency range. And since compressors fundamentally reduce gain, boosting into compression can have the opposite effect sometimes. When I boost after compression it feels normal, natural, and obvious. Conversely I like to cut before the compressor so it doesn’t respond to undesirable stuff. Sure there are times I may break these norms, but it’s pretty rare.

GETTING WARMER
Because most people record with directional microphones, proximity effect leaves many voice recordings with plenty of bass. But when a recorded voice sounds thin, I raise a parametric EQ 3 to 6 dB and sweep through the 80 to 200 Hz region listening for warmth. I tend to start with a moderately narrow Q: 2 to 4. If things sound good through a wide range then I’ll open up the Q. I’ll back off the gain until it feels warm, but not tubby. In addition to listening for warmth, I’m also listening for weird room resonances (which will overhang past the voice like a short reverb) and other, less pleasant characteristics. I don’t want to trade a solid low end for another problem. So it’s a combination of finding warmth without also accentuating something problematic.
Just north of here, in the 200-350 Hz region, things can sound thick. I don’t tend to boost here because it can make a voice sound nasal, chesty, and/or congested. I’m more likely to cut here than boost. Unless it actually sounds good (which is occasionally does), in which case I will boost it. Any audio “rule” should be considered breakable. Ultimately, how it sounds matters more than what you’re supposed to do.
HERE
The old Academy Curve had a presence boost in the 2-5k Hz range. When you need more “here and now,” this is the range to sweep. As with warmth, I like a moderately wide Q and a boost of 3 to 6 dB to go hunting for this flavor. In the lower part of this range things can honk. As you move up things can get sibilant. Find the presence frequency while avoiding honk and/or sibilance; try not to trade presence for a bigger problem.
Sometimes boosts in this range will exaggerate mouth noise. If the performer was sticky and click-y, you’ll be hard pressed to boost in the 2-5k Hz range and not bring out mouth noise in the process. In my experience EQ isn’t going to help you get rid of mouth noise, but it can definitely make it worse.
If you know the mic used to record the voice, this may influence your frequency choice for boosting. For example, the Shure SM58 tends to give a lot in the 5-6k Hz region. If the voice is miked by a 58, you probably don’t need to boost any more in that range. It’s far more likely that you need something below that to get more presence (and/or cuts are needed somewhere below 300 Hz, and/or the mic position is bad).

Shure SM58 frequency plot via recordinghacks.com
You may find if you work with the same person a lot you get to know characteristics of their voice. For example, I known an actor who has sibilance at about 11k Hz. So I don’t like to boost her voice in that range. Generally speaking, if a male voice is sibilant it will tend to be in the 3-5k Hz range. If a female voice is sibilant it will tend to be in the 5-8k Hz range. But that’s just a strategy. Don’t follow it like a recipe or you may inadvertently trash a recording of someone’s voice who is sibilant outside of the usual range. Sometimes you can see sibilance on a real-time analyser, which may help you find it more quickly. But if you sweep through the 3-12k Hz region with a narrow Q and a significant boost, your ears will tell you where the harshness resides. Don’t emphasize it in the name of presence.
If simple EQ moves don’t address a sibilance problem you’re having, you might need Extreme EQ, or even a De-Esser.
UP IN THE AIR
Somewhere above sibilance you start to get an airy quality. The voice and microphone play a huge role here. If the mic falls off rapidly above presence frequencies, you may boost like crazy at 12k Hz and never get much air. If the performer just doesn’t have an airy voice, EQing for it isn’t going to be as effective. Being able to boost the airy part of a voice can be elusive compared with warmth or presence.
 Up to this point all of these boosts have been implemented with a bell shaped, parametric filter. While it too can be emphasized with a bell, I prefer a high shelf boost to embellish air in a voice.
Best practices for enhancing air are different for dialog and a vocal. In dialog folks generally don’t go for a lot of air in the voice. But in music, air in the voice can sound magical. By all means break the rules if it works for your project, just know that the expectations are different for air in the voice depending on whether you are mixing for dialog or a singing vocal.
EQ IN MATHMAGIC LAND
Tonal sounds of the voice will usually have harmonic content. So if you find something you like at 120 Hz, you will probably like what’s going on at 240 Hz, 360 Hz, 480 Hz, etc. Remember warnings earlier in this article about how some boosts can cause unwanted consequences? Well if you love the warmth at 120 Hz but there is some crazy HVAC noise it emphasizes too, try to get warmth from an interval instead.
Another use for harmonic relationships is feathering. This is where a little EQ is applied to several intervals at once instead a huge boost at only one frequency. Feathering works pretty well with voice tone, but try it with other sources too.
So when you sweep through and find something worth boosting, consider intervals of that frequency to boost instead, or in combination.
AND REMEMBER
If the voice sounds great alone, but seems lacking when combined with other elements, you may need to boost something in the voice. But don’t forget that you may benefit just as much, if not more, from cuts in other elements that leave sonic landscape available to hear that great voice. You can even cut a little in competing sounds and boost a little of the same in the voice, getting the sound you want without resorting to extreme cuts or boosts.
Also in this Voice Processing series:
Frequency Cuts
Compression Effects
Compression Technique
Extreme EQ!
Limiting
De-Ess
 There are any number of different ways compressors can be applied. But I’d like to focus on the ways I tend to use them for vocals and dialog. Not all compressors are the same — some have as few as two controls! But let’s have a brief look at all of the major parameters that may be available on compressors so we can adjust what’s actually available on any single unit.
KIAI!
Many of the basic effects of compression can usually be obtained with “auto” attack and release. But the more exotic colors come from tweaking these values. This is especially true for the increased impact you can get from slowing down the attack.
Much of the time I find my manual attack settings between 5 to 30ms for voice. As I push out toward 30 and beyond, the compressor lets the front edge of new syllables sail through freely, then it clamps down afterward. It is more noticeable for syllables that begin with a sharp, percussive sound.  Longer attack times will exaggerate sharp sounds for more punch and impact. The downside is that the compressor does less to reduce peaks. That means the makeup gain can’t go as loud as a quicker attack time without running the risk of clipping the channel. So this is a trade off.
On the other end of the scale, super quick attack values may sound thicker, heavier. So open up your attack time a bit to lighten up, or choke it down and hear if that adds the right kind of weight.
CATCH AND RELEASE
When my chosen compressor does not have an auto release function, I find my setting for voice in the 20 to 80ms range. The release time will be slower than my attack setting. I generally like to have the compressor fully recover between syllables or phrases. So for a quick, choppy delivery I will have a shorter release time and for held, legato notes my release time will be longer. If your compressor isn’t recovering a noticeable amount in between, then you’re just turning everything down all the time. If your release time is too quick, you may hear the voice pump, breath, and otherwise sound terrible. As the release gets longer the compressor will sound smoother, bring up less low level detail, and level out the volume of the signal overall.
If a compressor has an auto release or signal dependent release option, that tends to sound good on voice. The variable release of the LA-2A is a big part of the magic that box imparts. I don’t usually select a fully manual release time for voice if auto release is an option. In the rare case when I choose manual over auto it’s usually to intentionally make things sound weird or unnatural.
SAY WHEN
I don’t have a “most of the time” threshold setting, because it depends on the level variation of the voice and interaction with other compressor parameters. The key is how much gain reduction I want to obtain. Generally, I set the threshold so that the gain reduction is just a few dB RMS, 3 or 4 at the most. There are many important exceptions, but hitting for just a few dB is how I generally target for voice. When the gain reduction is heavy on a compressor, a voice can sound artificially processed. And that might be great in some cases, but most of the time I want a voice to sound natural.
You may have noticed that once you have the threshold set for the gain reduction you desire, adjusting the attack, release, and other parameters can change the amount of gain reduction. This interplay means that I will probably revisit the threshold setting when any other parameter changes significantly. I’ll check the gain reduction during different parts of the song or program too, and make adjustments if I encounter compressor inputs that are much louder than the signal I used to set the threshold initially. My point: I seem to adjust and re-adjust the threshold more than any other compression parameter.

RATIO
Some sounds benefit greatly from high compression ratios. But voice isn’t one of them. In my experience, compression ratios lower than 2:1 work well for voice. I’ll routinely use from 1.2:1 to 1.5:1 ratios on voice. This allows my threshold setting for several dB of gain reduction to be active more of the time, on a wider range of signal volume. This tends to sound more natural and be more effective, in my opinion.
On the other hand, I do love to use higher ratios and more severe gain reduction in a different context: parallel compression.
DUELING CHANNELS
Often attributed magical properties, parallel compression is a good trick. The signal path gets split in two, with the voice bussing to two channels at the same time, then different processing is applied to each side, and finally they are recombined. The compression is only applied to one channel, which can help it sound less obvious. That’s because a loud passage comes roaring through the uncompressed path, and the compressed channel is relatively lower in volume. So the compressed voice “gets out of the way” for the uncompressed. Quick, percussive syllables still sound fast; the compressor lowers its side of the signal, which makes it less noticeable by comparison. When the voice is soft the compressor opens up to reveal low level details. It’s like someone going through your whole mix automating the volume up for all of the quiet parts.
The technique from olden times is still used today, using two channels on an audio console. The tape return (or DAW output) goes to a vocal channel and is then sent on an alternate path using a buss or aux send. This secondary output is patched into a compressor then returned to a second console channel input. The uncompressed channel and the compressed channel are both mixed together. 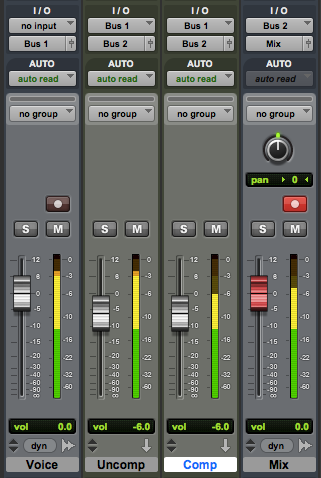 In a DAW the voice can be bussed in the box to two aux channels. Compression is added to one of the channels. The output of both channels are mixed together. In recent years we’ve seen plugins with a wet/dry mix option. This allows a single channel to pass some uncompressed plus compressed signal at the same time, simplifying the setup for parallel compression.
I typically adjust my compressor parameters until the compressed signal is lower than the other channel for loud voice, and higher than the other channel for soft voice. With that compression scheme, my mix is almost always 50% compressed and 50% uncompressed (each channel output set -6dB). I may go automate something different later, such as pushing the compression channel when I want more perceived volume during extreme shouting. But 50/50 is where I start and frequently stay.
NEXT LEVEL COMPRESSION
Parallel compression provides some unique mixing opportunities. For example, if you want a consistent amount of a sparkling plate reverb for the voice all of the time, your send to the reverb can be from the compressed channel only. If you want a dynamic delay that rings out mostly in the loud passages, send from the uncompressed channel only.
Performers with mic technique will tend to lean in for quiet parts and pull back for louder stuff. That’s often helpful, but it can also mean the quiet parts have more bass than louder ones due to proximity effect. But if you apply a frequency cut and/or shelf in front of the compressor (on that channel only) you can thin out the quiet parts. Likewise if the quiet parts are difficult to understand, you can apply an EQ boost in the 2-5k Hz range after the compressor to aid diction.
Basically, processing on the uncompressed channel tends to be heard more during the loud parts and processing on the compressed channel is better heard during the quiet parts. Being able to target your processing based on loudness is advanced sonic kung fu.
AGAIN! AGAIN!
I love the metaphor that compression is like painting: if you apply it all at once you get a big, gloppy mess. But if you apply it in layers, you get better coverage for a nicer finish.  This is my favorite compression technique secret — don’t just do it once, do it several times. I like to apply a few dB of analog gain reduction when recording, then maybe some more on the signal in the box via plugin, then maybe some more on a group buss (for instance, all of the vocals), and probably some more compression on everything when the full mix is mastered.
This serial compression works much better if each iteration is slightly different. For example, use a low ratio for recording. Then use a different sounding compressor with a higher ratio as part of parallel compression. Maybe the attack and/or release values are different for one of the many layers. This way the gain reduction doesn’t keep hitting the voice in the same spot over and over, or all at once. Instead the voice is gently reshaped and refined from recording to final mix.
Also in this Voice Processing series:
Frequency Cuts
Compression Effects
Frequency Boosts
Extreme EQ!
Limiting
De-Ess
Additional compression articles:
Basics of Compression by Justin Matley
If frequency cuts are less than obvious, using compression can be positively counter-intuitive. I don’t know any way to write or talk about compression that leads to an ability to use it without actually using it. A lot. You have to try, and probably fail at first, to get any good as using audio compressors.
The most obvious “result” you get from a compressor is that it turns down the loud parts. And when I was first learning I couldn’t figure out why that was a good thing. After playing with compression for a bit I realized that lower max volumes meant that the whole thing could be turned up louder: “make up gain.” This is the origin of the first desirable effect of compression: increased apparent loudness. If the reduction of the loud parts isn’t so exaggerated that it sounds awful, then turning that signal up can make it seem like it is louder overall. And this may be the most common reason people use a compressor, though it is certainly not the only one.
 Increasing the perceived loudness may bring other perceptions: more presence, better low level detail, and increased intelligibility. When mixing a vocal in a song or preparing dialog for use in a game or film, these improvements can be significant. Even slight improvements in presence, detail, and intelligibility make compression worth the trouble of learning how to use it. But there are other sonic consequences of compression.
Frankly speaking, bad compression is annoying. The pumping and breathing of poorly/over-compressed voice makes most other audio professionals cringe and may even be distracting for untrained listeners. Really smashing the louder parts can sound weird too, even if it doesn’t pump. Squashing the peaks may also take away power from sounds that would otherwise have more impact. Heavy compression can put things off balance, so that louder parts seem too soft and the soft parts seem too loud. Of course bringing up low level sounds can mean making it easier to hear noise, room reflections, breathing, and may exacerbate sibilance. Compression can make plosives worse too. Filtering before compression can help minimize the blossoming plosives that compression may cause.
Most of the time these examples of bad compression would be considered undesirable. There are times when our list of “bad” things sound cool, and rules are meant to be broken. So go nuts when it works for your project. A few other compression effects may be good, or bad, depending on the desired outcome. Compression may make a voice sound thicker, heavier. If you wanted a delicate, airy quality then this effect would be considered a failure. But plodding songs, serious themes, and moody dialog might benefit from a weightier sound. Compression may also level out variations in volume, to a point where it sounds like someone automated volume rides for a consistent volume. If you want everything closer to the same volume, then this effect is pretty useful. But if you want the whispers soft and the screams loud, leveling can make things worse instead of better. When the attack is set slow enough to allow the front edge of a new sound through, compression can make things sound “punchier.” That’s good when you want more impact, bad when you want things nice and smooth.
If you’re just getting started with compressors, or growing your compression skill set, listen for these effects as you adjust the controls. Read how to achieve these sonics: compression techniques for voice.
Also in this Voice Processing series:
Frequency Cuts
Compression Technique
Frequency Boosts
Extreme EQ!
Limiting
De-Ess
The secret to a great sounding dialog or vocal mix is a good recording: plosive free, without mouth noise, sans funky contributions from the room, and lacking sibilance. I suppose an inspired, well performed recording helps a little too. But let’s assume we have a decent voice recording and it’s time to mix/process toward the final audio program.
The way I see it, good voice processing has similarities across media: music, film and TV, game audio, broadcasting/podcasting, theme park shows, talking toys, etc. Typically we want to understand the words, bring out the best qualities of the voice, and optimize for the technical limitations of the playback situation. To that end I have a typical voice processing chain. I don’t see it as a recipe to follow regardless of the context, but rather a starting point to tailor the sound for each unique production.
FOCUS
 My first step is probably the most important and definitely the most likely for me to implement: Frequency Cuts. Philosophically, I think of this as simplifying the signal closer to its essence. For voice there is usually low frequency information that gets recorded but we can’t hear. It is good to filter out that stuff. When directional microphones are used up close, proximity effect may be audible. A shallow low rolloff might help, as previously discussed. When the presentation will have a limited high frequency response, I like to use a high roll off too. If there are “ugly” frequencies in the recording, I’ll use a parametric to find and minimize those. Anything that doesn’t benefit the end result may be minimized using equalization.

CONTEXT
Other cuts may involve spectrum that sounds fine for the voice by itself, but that won’t be important in the larger mix of elements. This isn’t a significant issue for voice only or voice dominated projects. But for song vocals, sonically busy scenes, and other source rich environments, additional cuts in the voice can free up spectrum for other sounds. These may not be obvious at the very beginning of the mix, but instead tend to be uncovered over time. While contextual cuts are less obvious, they can be just as helpful toward a great sounding result.
EXTREMES
In some cases a voice may be heavily modulated. Cartoons, monsters, aliens, robots, and many other kinds of voices are severely processed. In these cases, it is important to consider what’s being done to the voice before applying low/high cut filters or parametric EQ. For example, if a varispeed up will be applied (faster AND higher in pitch) a low rolloff may be important to prevent subsonic frequencies from becoming audible. And it may not be obvious what frequency or steepness a high pass filter should take until hearing the voice post-varispeed. So there may be an iterative process of cutting, mangling, revisiting the cut, revisiting the mangle, etc. There may also be cuts after the voice is morphed. As with all things audio, let your ears inform your decisions.
Cutting frequencies isn’t intuitive. No, the obvious approach is boost what we want to hear. So why bother cutting? And why make cuts the first step? If there are other processers applied to the voice, I don’t want any of them trying to cope with spectrum we can’t hear, or don’t want to hear. A high pass filter and potentially any other useful equalization cuts seem to work best when applied up front. I try to be judicious here; nothing too crazy. But I am always rewarded for focusing the voice on the parts we want to hear by removing and minimizing the parts that we don’t.
Also in this Voice Processing series:
Compression Effects
Compression Technique
Frequency Boosts
Extreme EQ!
Limiting
De-Ess
In professional relationships I like to tell people, “I reserve the right to be wrong.” Originally this was a simple ego check; a way to let people know that I take responsibility for my errors as well as successes. Since everyone makes mistakes, please allow me the opportunity to fix mine. Let’s identify the problem — even if I am the source of it — so that we can ultimately get it right. But identifying my points of failure is taking new meaning.
I heard a piece on the radio about the Ikea Effect. In brief: when we invest our time and effort into something, we often become enamored with it. The pride of I made this threatens good decision making if we become so attached to it that we can no longer see things objectively. As a recovering shade tree mechanic, nacent “maker” and proud Do-It-Yourself-er I run the risk of being blinded by my own handywork. Does this microphone actually sound better because I modified it, or do I simply love using it because I am emotionally invested? Is my new workflow really the best choice for this project, or does my time spent creating it bias me?
 Some of my most valued relationships are with people who will listen to my “elevator pitch” for something I am creating. I can get better results if I’m open to hearing the flaws instead of simply getting a pat on the back. And helping me is no small task. These people have to be willing to listen to my thoughts, bring some knowledge to the discussion, and tell me honestly about the parts that don’t jive. Inviting criticism isn’t fun. Or easy. But one of the reasons I like having conversations with other audio people is the opportunity to tease out the good from the bad. If I spent too long assembling that bookshelf, I may overlook my fairly obvious mistakes. I need folks who will ask, “Is it supposed to be like that?”
See also: Hammer Everything, an exploration of how tools influence decision making.
