
With thanks to Chris Bolte, I discovered the Cenozoix compressor plug-in, which includes 12 vintage analogue emulations. Three-Body Technologies, makers of the plug-in, seemingly did not pay the companies who’s vintage products they emulated. It’s likely they didn’t want to identify the hardware that they were trying to replace for fear of being sued. That’s fair, but I wanted to know! So I did a some digging. I also wanted to learn more about the different kinds of compressor sounds that have been used in the past, including all of those non-linear transfer curves.

Someone may ask: how close did they get to the analogue boxes? Some folks suggest they did it well, while others complain that the differences between the 12 styles are pretty subtle. I say: listen to the online demos and decide for yourself. I liked them enough to purchase. But what I’d like to do here instead, is list my best guesses at what gear they are trying to mimic, and leave your quality evaluations for you. Plus, this is a great opportunity to celebrate the aural qualities that we have inherited from the analogue gear that preceded digital plug-ins.
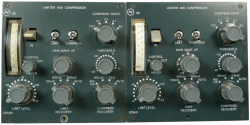
Brit VCA: SSL Channel compressor. The 4000 E had a punchy, aggressive channel compressor. It employed a VCA for feedforward detection with RMS. The Revision 4 dynamics added the “over-easy” soft knee, and a logarithmic release curve. The 4000 G series sounded tighter, and more focused. The Cenozoix manual uses the words “tight” and “punchy” which makes me think it is emulating the G series channel compressor. The physical console compressor had three knobs: ratio (1:1 to infinite:1), threshold (+10 to -20), and release (.1 to 4). The attack was adaptive, in a range of 3–30ms. Employing the “Fast” button fixed the attack at 3ms, and independently seemed to increase the amount of gain reduction applied.
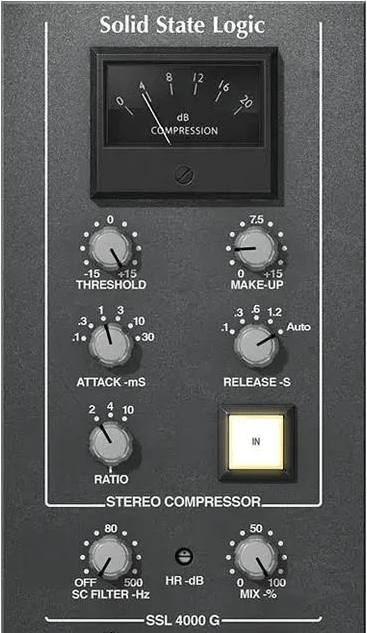
Glue VCA: SSL Bus compressor. Solid, tight, and hyped. Apparently the 4000 bus compressor sounded consistent across the series, from B to G. And according to the 9000 J series manual, that bus compressor “…is identical to the design used in the G Series range.” It incorporated peak detection and a sidechain VCA within a feedback loop. On the original hardware, the knee point of the compressor, set with the threshold control, purposely changed depending on the setting of the ratio control. Decreasing the ratio setting also lowered the effective threshold, maintaining the perceived ‘loudness’ of the compressed signal. One version of the original hardware compressor had seven adjustments: threshold (-15 to +15), makeup (0 to +15), attack (.1, .3, 1, 3, 10, 30 in msec), release (.1, .3, .6, 1.2, and auto in sec), ratio (2, 4, 10), sidechain filter (off to 500Hz), and mix (0–100%).

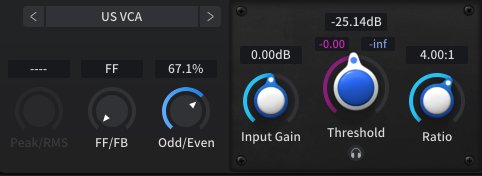
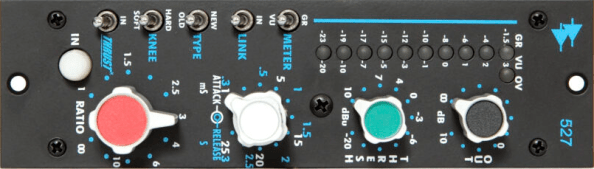
US VCA: API 527, or similar. Clean, bright, and punchy. The original hardware had a “THRUST” control that applied a high-pass filter to the detector at roughly 3dB/octave below 1kHz, though the user manual seems to indicate this continues all the way up the audible spectrum as an inverse of the pink noise shape to evenly distribute spectrum feeding the detector. The “TYPE” selector could employ feed back detection, which was peak detecting, and was described as smoother, softer, and more transparent. When selected feed forward, which was RMS detecting, this option was described as more aggressive compression and a harder, more affected sound. The knee selector allowed for a SOFT, “over easy” style transition into the ratio. The threshold was continuously variable from +10 to -20. The attack was continuously variable between 1 and 25 ms. The release was continuously variable between .3 and 3 seconds. Ratio was continuously variable between 1:1 and infinity:1.
Black VCA: dbx 160. The very first dynamics controller with a Voltage Controlled Amplifier (VCA), the revolutionary gain reduction device with a linear transfer curve. The detector is RMS. The original hardware had three controls: threshold (10 to -20), compression (ratio, from 1.5:1 to infinite:1), and output gain (-10 to +20). The original 160 did NOT have an Over Easy, soft knee option, which was first added as an always on function to the dbx 163, and as a button on the dbx 165.
Red VCA: Focusrite Red 3. Clean, transparent, and warm. A peak detecting VCA compressor (not RMS). The hardware has a ratio selector for 1.5, 2, 3, 5, 7, and 10:1. The attack times from .3 to 90 ms, and release times from 100 ms to 4 seconds are both continuously adjustable. There’s also a little yellow button for an auto-release option. The threshold can be set from -24 to +12 dB.
Johan Englund made the point on Airwiggles that this probably isn’t an emulation of the MXR Dyna Comp, which was my first guess. I was fascinated by this red stomp box for use with an electric guitar, which has knobs that look a lot like what’s shown in the Cenozoix interface. The MXR intentionally colors the sound, adding a sheen on top, and thinning the low end. Sweet guitar sustain, with single notes that bloom & soar, and popping, ringing clean chords. The hardware had two controls: output, and sensitivity. Squishy, with a fast attack (5 ms), and long release (1 sec). The ratio is estimated to be 10:1.
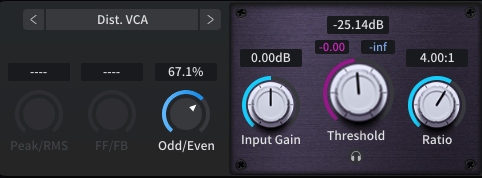
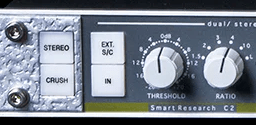
Dist. VCA: Smart Research C2. Tight, thick, and huge. The original hardware combined a clean VCA path with a “Crush” FET gain control stage for an overcompressed sound, that also added a high frequency lift, which has been described as airy, or glossy. Ratios: 1.5, 2, 3, 4, 10:1, and Limit. Attack: 0, 0.1, 0.3, 1, 3, 10, and 30 ms. Release: 0.1, 0.3, 0.6, 1.2, and 2.4 seconds.
Black FET: Universal Audio 1176LN, black. Of all the compressors that can be described as punchy, this is arguably the most punchy. It manages to knock down the loud parts without sounding flat, or lifeless. It is a feedback peak detecting compressor, which slows the response. The original hardware had four knobs: input, output, attack (0.02 to 0.8 ms), and release (50 ms to 1.1 sec). And there were ratio selectors for 4:1, 8:1, 12:1, and 20:1. You could press all of the ratio buttons for an even more extreme sound.
Blue FET: Universal Audio 1176 Revision A, silver with blue. This represents the first version of the compressor, with more harmonic distortion, aggressive sounding upper mids, and classic “vintage warmth.” Depending on the source material, the prominent upper midrange and increased harmonic distortion can produce results that sound even punchier than the 1176LN with black faceplate.
Vintage Opto: Teletronix LA-2A Leveler. Smooth, gentle, transparent, and full-bodied. The original tube-driven (warm sounding) compressor features an electro-optical attenuator, with a non-linear transfer curve that knocks down loud parts while still sounding dynamic. The detector is RMS. The original hardware had two control knobs: gain, and peak reduction. The attack time is .01 ms! The release time varies from 0.5 to 5 sec. Some hardware versions included a switch to compress or limit, with compression using a ratio estimated at 3:1, and limiting estimated at 10:1. Gain reduction maxed at 40dB.
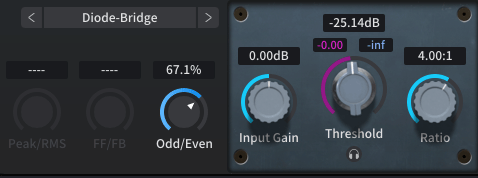
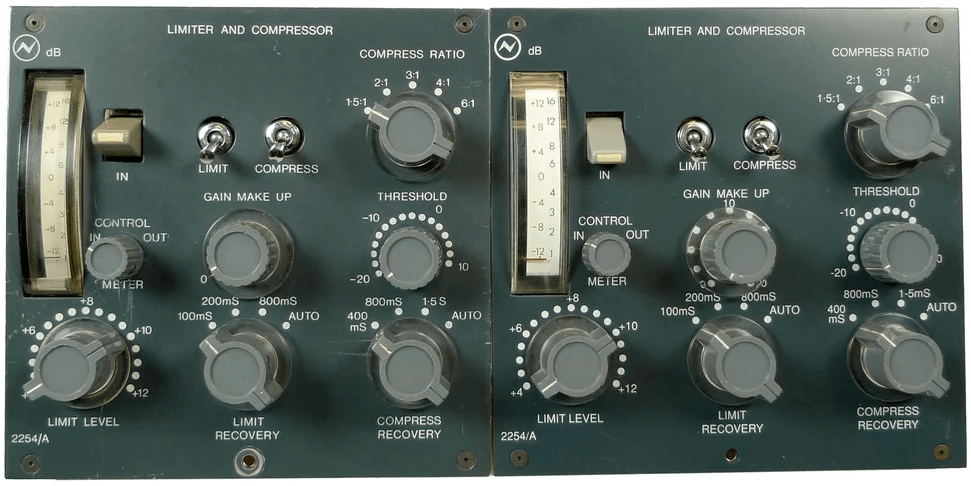
Diode-Bridge: Neve 2252, 2253, 2254. Smooth, silky, and sweet sounding, with purpose built transformers contributing to the color. A peak detecting dynamics controller with separate limiting and compressing capabilities. The 2254R has adjustable “fast” attack limiter times from .1 to 2 ms, while the standard attack time is 5 ms. Distortion is more likely with faster attack times, especially under 1 ms. The limiter release times are: 100, 200, 800 ms, or “AUTO”. The compressor ratio selector offers: 1.5, 2, 3, 4, and 6:1. The compressor release times are: 400, 800 ms, and 1.5 sec, plus an “AUTO” mode.
Virtual-Mu: Altec 436, Altec 438, and/or Altec RS 124. Smooth and warm; a gentle, vintage compressor. Originally designed for use on voice in public address systems. The heavily modified RS 124 was used extensively on Beatles recordings. This variable-mu tube compressor has a ratio that starts at 2:1, and gets steeper as the threshold is raised, maxing at 4:1 with a threshold of +16dB. It has a fixed attack time of 50 ms. The 436C has a release adjustment (.3 to 1.3 sec). It offered maximum compression of 30dB.
Vintage Tube: Fairchild 660, 670. A warm sounding variable-mu tube compressor. Attack and release times were tied into a single control called Time Constant, with six positions: 1. attack 0.2 ms/300 ms, 2. 0.2 ms/800 ms, 3. 0.4 ms/2 sec, 4. 0.2 ms/5 sec, 5. 0.4 ms/2–10 sec, and 6. 0.2 ms/10–25 sec! The compression ratio was tied to the threshold, with ratios as low as 2:1, and as high as 30:1.
Let me give a quick shoutout to the two sources I most often used to collect information about these vintage hardware compressors: Sound On Sound, and Vintage Digital.
So, if you’re looking for a dynamics plug-in to get the kinds of sounds that these analogue compressors could render, have a listen to the demos to decide if the Cenozoix Compressor might be what you need. As a long time fan of the 1176LN, I reach for the Black FET option frequently. And if you want to check the Cenozoix manual for clues (that’s what I did), see pages 21–24 (PDF pages 24–27), and share your opinions about what they are emulating in the comments.
Options Slate Digital offers a huge line of vintage emulations. I’m a big fan of the McDSP 6030 Ultimate Compressor with ten compressor modules in a single interface, eight of which are vintage emulations, and two of which are kind of gap fillers, imagining what vintage compressors might sound like across a range. FabFilter C3 offers Style options for optical (2 varieties), variable-mu, and feedback detection, as well as Character options to drive harmonic distortions that mimic tube and diode hardware. Please drop your vintage emulation plug-in favorites in the comments.
I know many folks who enjoy customizable buttons to trigger actions in their Audio Workstation. I have a Stream Deck profile page dedicated to nudge, which is handy for editing dialogue. But the stock icons were not helping me quickly find, and press the button I needed. So I created some nudge DAW icons for Stream Deck that were easier for me to use. Maybe you’ll find them helpful too.
Download from Google Drive.
I included icons with no text so you can add your own text in Stream Deck.
Maybe these inspire you to create icons for yourself. You can use Elgato’s Key Creator, or you can use another image editing app, like Canva, Keynote, PowerPoint, etc. I got some good ideas from this video by Melanie Dyann, including how to make animated icons!
My nudge icon goals were pretty simple, and I’m quick with Keynote, so that’s what I used. You simply need to export slides as images to render your icons as JPEG, PNG, etc. In her video, Melanie recommended a canvas of 144 x 144 pixels. Keynote didn’t like those tiny dimensions, so I added a zero at the end: 1440 x 1440 pixels.
In previous posts we wrote Lua code to trace what’s happening, obtained a media item name, and separated an extension (“.wav”). Let’s use what we’ve learned to obtain a media file name.
When we got the media item name, we started with the media item identifier. But because a media item can contain more than one take, we used the item identifier to get the active take identifier, which connected us directly to one, and only one, media file. We named that variable take, and we need to use it again for that connection to the media file.

As with getting the item and takes, the statement reaper.GetMediaItemTake_Source returns an identifier, not a string of characters. The statement reaper.GetMediaSourceFileName uses the identifier to get the string of characters that spell out the file name.
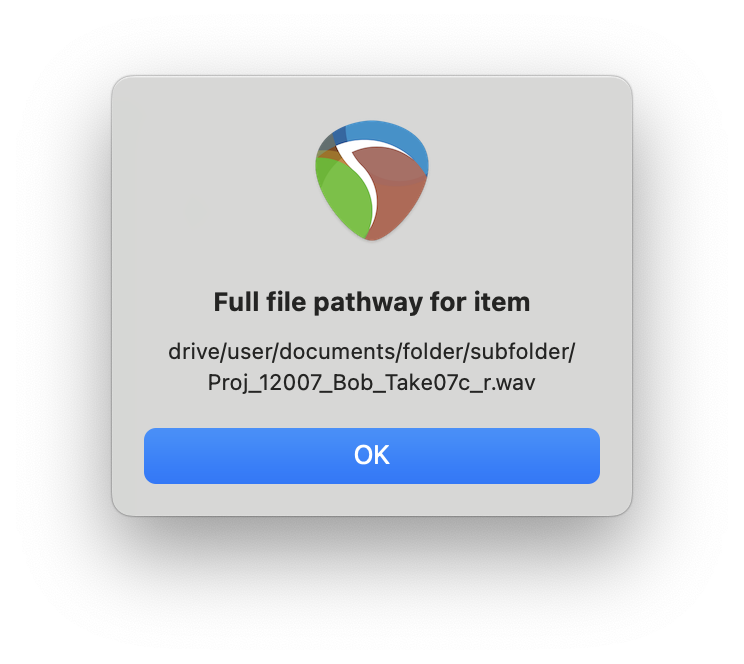
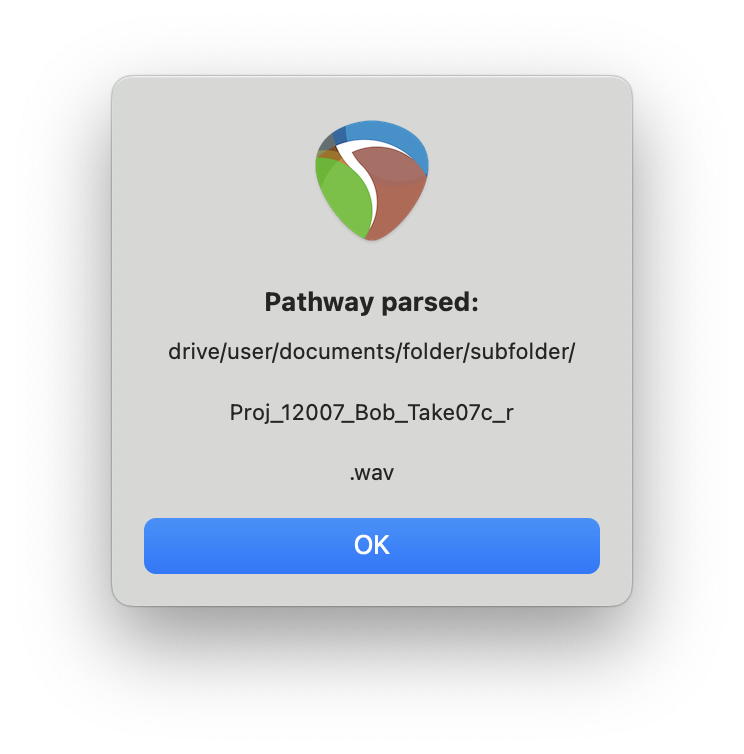
The operating system stores media files on the hard drive in a folder structure. What we have retrieved is the whole file pathway, not just the file name. If we execute reaper.MB (pathway, “Full file pathway for item”, 0), the display might look something like this:
Let’s separate the file path, file name, and extension. To isolate the file path we can use a for loop to find the character position of the last slash.
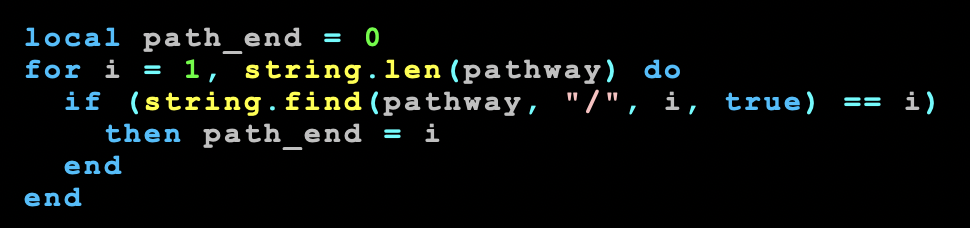
Just like when we previously found the last period, we start counting character positions at 1, and increment until the string.len of pathway. In our example above that’s 66. The string.find equals i evaluation will be true in the if statement at positions 6, 11, 21, 28, 38, where the then path_end = i is executed. After 38, (string.find(pathway, “/”, i, true) == i) will evaluate as false, so path_end will equal 38 when the for loop ends at 66.
Now that we know where the file path ends, let’s use another for loop to find the last period, the character that separates the file name from the extension. We could start testing for period at the first character position in pathway, but the last period should be after the end of the file path. So we can for loop from path_end to the string.len of pathway. In this case, we loop from 38 to 66.
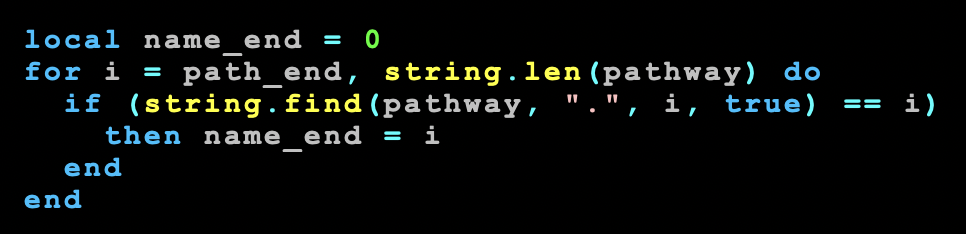
That last period is at character position 63, so that value gets stored in the variable name_end. With the variables path_end and name_end evaluated, we can use string.sub again to pull out the name and extension from pathway.
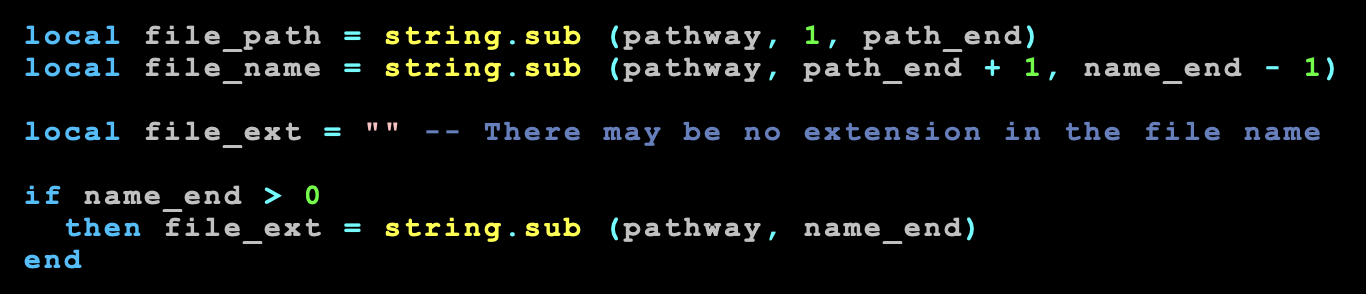
In our earlier block of text, right before the for loop, we assigned name_end = 0. If there was no period anywhere in pathway, if would be false for every value of i, and name_end would never increment, remaining zero. So the test if name_end > 0 allows us to update file_ext from “” to “.wav” because we know at least one period was used in pathway. Otherwise there is no period, thus no file extension, so file_ext would remain empty.
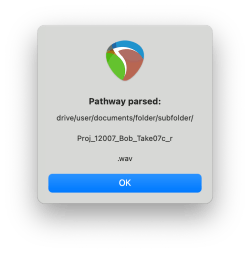
If we code a display message reaper.MB(file_path .. “\n\n“ .. file_name .. “\n\n“ .. file_ext, “Pathway parsed:”, 0) we will generate a message box that looks like this:
Having separated these component parts, we could write code to use a media item name to update the file name. With some effort, we could check to see if our updated file name already exists, and slap an incremental number on the end of that file name to generate a unique file name for version control.
POSTS IN THIS SERIES
Beginner’s Guide to Reaper Script
Get Item Name with Reaper Script
Separate an Extension Like .wav from Item Name with Reaper Script
Get File Name with Reaper Script (you are here)
Rename File with Item Name including Version Control in Reaper Script (pending…)
In previous posts we explored how to display information to help trace what’s going on as we work on the code, then we saw how to use statements from the ReaScript API to get a media item name.
Now let’s separate the name “Dialogue 007” and the extension “.wav” into their own variables. It’s possible there is more than one period in an item name. So to get to the file extension with some accuracy, we want to find the last period in the full_take_name from left to right. We could write it like this:

This section uses several general Lua statements, the first two are:
< for count = start , end do block end >
< string.len (string) >
The for statement is referenced in Lua 5.4, section 3.3.5. We’re creating a loop that incrementally counts. The variable i is used in the for statement to keep track of the count. The count starts at i = 1, and continues until i = string.len(full_take_name). The statement string.len returns the total number of characters in the string. In our example, the variable full_take_name contains “Dialogue 007.wav” which is 16 characters long. So our for loop will start at 1, and terminate at 16. Everything between do and the second end gets repeated inside the loop.
< if (expression) then block end >
The if statement is detailed in Lua 5.4, section 3.3.4. We use the if to do something, or not, depending on the evaluation of the expression. In this case, if there is a period, the code between then and the first end is executed. If there is NOT a period, the code between then and the first end is ignored.
< string.find (string, pattern, starting character number, plain boolean) >
We check for the period using string.find. All three of the string statements are detailed in Lua 5.4, section 6.4. The statement string.find returns a set of indices, which are the character locations for the beginning and ending of the pattern. In our case, there’s only one character in the pattern, and we only evaluate the first index, with we compare against the value of i. The expression string.find(full_take_name, “.”, i, true) == i will be true or false, and is used by the if statement.
There are four parameters inside the parentheses of string.find. The first is the string in which we are finding, which is our value stored in full_take_name. The second parameter is a search pattern, which in this case is simply a period enclosed by quotation marks. The third parameter is optional, and crucial for using the counting loop to narrow down the last occurrence of period. It defines the starting character position inside the string we are searching. We use the counting variable i to search starting at the first character, then starting at the second character, then third, until we get to the final, sixteenth character. The fourth parameter is also optional, and is false if left blank. But we use true here because we want to evaluate an actual period, not a wildcard represented by a period.
As i increments in the for loop, string.find first evaluates if there is a period at i in “Dialogue 007.wav”, which is false. Then i increments and it evaluates if there’s a period at i in “ialogue 007.wav”, which is also false. This continues (“alogue 007.wav”, “logue 007.wav”, etc.) until it evaluates “.wav” which is true, because i is 13 and string.find returns an index of 13. After that, “wav” does NOT contain a period at i, so the value becomes false again, and the code between then and the first end is ignored again.
If the substring contained a period at location i, the variable take_name_end was assigned the value of i. So when i was 1, and the substring was “Dialogue 007.wav”, the variable take_name_end remained 0. When i was 2, and the substring was “ialogue 007.wav”, take_name_end remained 0. But when i was 13, the string.find of “.wav” evaluated the “.” at the starting index of 13 in full_take_name, so the then clause executed take_name_end = i, thus take_name_end was assigned 13.
After that the substring was “wav”, there was no period, so take_name_end remained 13, because take_name_end = i was ignored in the then block. And when i was 15 and 16, take_name_end still remained 13. The for loop ends at i = 16, with take_name_end equalling 13, the character location of the last period in “Dialogue 007.wav”. Having reached the end of the count, we exit the for loop at the second end.
The string.sub statement allows us to use the location of the last period, stored in the variable take_name_end to separate the take name from the extension. The format is:
< string.sub (string, starting character number, ending character number) >
And we can code the separation of the take name and extension like this:

In both variables take_name and take_ext we’re wanting a substring from the variable full_take_name, which is the string we use in the first parameter of the two lines of code, above. The second parameter is the location start of the substring, with the third parameter being the location of the end of the substring. So the take name with no extension starts at 1, and ends at full_take_name – 1. The extension starts at take_name_end, which is 13 is our example. The third parameter is optional, and when omitted in the take_ext line, defaults to the full length of the string in the first parameter, which is 16 in our example.
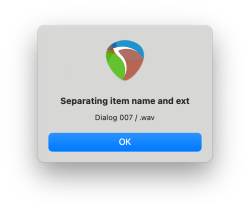
If we execute reaper.MB (take_name .. ” / ” .. take_ext, “Separating item name and ext”, 0), the following is displayed:

In the next post we get the file name associated with the item, and separate it into parts.
POSTS IN THIS SERIES
Beginner’s Guide to Reaper Script
Get Item Name with Reaper Script
Separate an Extension Like .wav from Item Name with Reaper Script (you are here)
Get File Name with Reaper Script
Rename File with Item Name including Version Control in Reaper Script (pending…)
Last time we learned how to display the information stored in variables with the reaper.MB statement. Now let’s examine how to obtain the name of a Reaper media item.
In the ReaScript API there are three statements we will use to obtain the item name:
< reaper.GetSelectedMediaItem (project number, selected item number) >
< reaper.GetActiveTake (item itentifier) >
< reaper.GetTakeName (take identifier) >
In Reaper, Lua uses identifiers for each media item, and it uses identifiers for each take within each item. The statement reaper.GetSelectedMediaItem returns an identifier, which we can capture in a variable. I like to name that variable: item.
The current project number is zero. I only intend this script to run in the current project, so I use zero here. If more than one item is selected, the first item is also a value of zero. It’s possible to work through several selected items by iterating that second number, but that can get complicated. For this script, let’s assume no more than one item is selected. Warning: if no item is selected, the evaluation will return nil. And we can check for that later*, but for right now, let’s start by assuming one, and only one item is selected. We could code that as:

The variable item is an identifier, not a name made of letters, numbers, and such. Since an item can contain more than one take, an item could be connected to more than one audio file. In order to name only one audio file, we need to specify only one. This puts us in a multi-step process to progress from media item identifier, to file name. The statement reaper.GetActiveTake uses the identifier stored in our variable named item to return the identifier of the active take in our selected media item. We could write it like this:

The identifier in our variable named take is connected to a single audio file. So with this step we’ve obtained a specific enough identifier to our selected media item to connect it with one audio file. And like the variable item, the variable take is an identifier, not a name made of characters. One more step is needed to obtain the name from the identifier, and we use the statement reaper.GetTakeName for that:

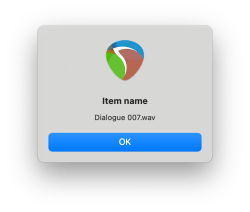
If we use reaper.MB (full_take_name, “Item name”, 0), and the item is named “Dialogue 007.wav” this will be displayed:
* Here’s the code I wrote to check if there is a Reaper media item selected, or not:

In the next post, we learn about the if statement above, and also how to separate the name “Dialogue 007” and the extension “.wav”.
POSTS IN THIS SERIES
Beginner’s Guide to Reaper Script
Get Item Name with Reaper Script (you are here)
Separate an Extension Like .wav from Item Name with Reaper Script
Get File Name with Reaper Script
Rename File with Item Name including Version Control in Reaper Script (pending…)

THREE THINGS
I couldn’t find a Reaper script that did exactly what I wanted. And my attempts to hack someone else’s code came up short. The Lua code used in Reaper didn’t look so weird to me that I couldn’t understand most of it. And it wasn’t difficult to find some pretty good resources for learning and understanding Lua. But like C, Lua takes a few different forms. So the first thing I needed: to learn how to write Lua specifically as implemented in Reaper.
Then there was a second part: the Reaper specific statements that are not in general Lua. I found the ReaScript API. But! It was more of a terse reference list than something organized for folks to learn from scratch.
Combining some Lua basics with the ReaScript API, I started coding. And I quickly realized I didn’t always understand what was happening when the script ran. The third thing I needed was: tracing. Specifically, to display values at key points in the progression through the code.
DISPLAY VALUES WITH: reaper.MB
I decided to use a Reaper specific statement for displaying values. The format is:
< reaper.MB (message, title, button option). >
For example, if we code this:

The resulting message box would be:

The zero value at the end specifies that single button at the bottom of the message box labelled “OK.” There are other button codes available, as detailed in the ReaScript API for the reaper.MB statement.
Forgive me getting super basic here, but for those who are not familiar with coding, one can store information in variables. Think of a variable as a box, a bag, or a container to hold information. And in Lua, you can use the statement local to define a variable just for this script. Local makes the variable disappear from memory when your code is finished executing, freeing up memory for other tasks. So here’s how we might use local to define two variables, then display those stored values with the reaper.MB statement:

The result would be:

With these ideas, we know how to capture and store information in Lua, and display that information to figure out what our code is doing. Next post: a few key statements from the ReaScript API to capture the name of a Reaper media item.
CHAT GPT?
Several friends suggested using AI to help write my script. And if I was only writing one script, that might have been a quick way to get it done. But my bigger plan was a whole set of scripts for tasks that carry me through significant milestones in my workflow. I didn’t suppose I could build a script ecosystem one AI written script at a time. Also, writing my own Reaper scripts felt more like a power user origin story.
POSTS IN THIS SERIES
Beginner’s Guide to Reaper Script (you are here)
Get Item Name with Reaper Script
Separate an Extension Like .wav from Item Name with Reaper Script
Get File Name with Reaper Script
Rename File with Item Name including Version Control in Reaper Script (pending…)
When recording voice, it seems helpful to start with a specific microphone position, then make adjustments depending on what the project needs, and what we’re hearing from the voice actor or vocalist. I’m not suggesting that there’s one, perfect way to always place a mic, just that strategies should be based on an intentional starting position.
MIC DISTANCE
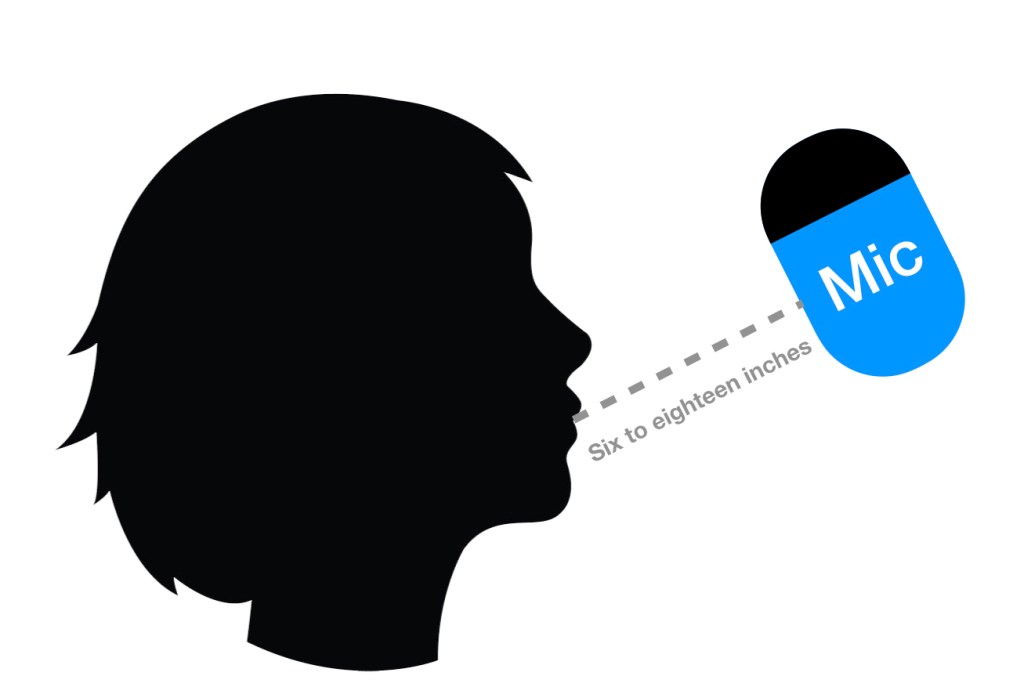
I like to start with the front of the microphone 6 to 18 inches away from the actor’s mouth. If a recording space seems noisy because of room reflections or background noise, I’ll place towards 6 inches to improve the signal to noise ratio. If a performer is loud, the mic is sensitive, and/or I expect significant proximity effect, I’ll place towards 18 inches.
Once we can hear how the starting distance sounds, I’ll move the mic closer or further for the reasons stated above, and also to help the performer with sight lines to script, or music. If the space is especially tight, that may limit how far we can move the mic away from the performer. The mic stand may limit where we’re able to place the mic also. This is why I am willing to spend money on a quality mic stand: to improve mic location possibilities.
POP SHIELD
I assume a pop shield will be needed and just include it in an initial mic setup, primarily because it’s easier to remove a pop shield than add one to an existing configuration.
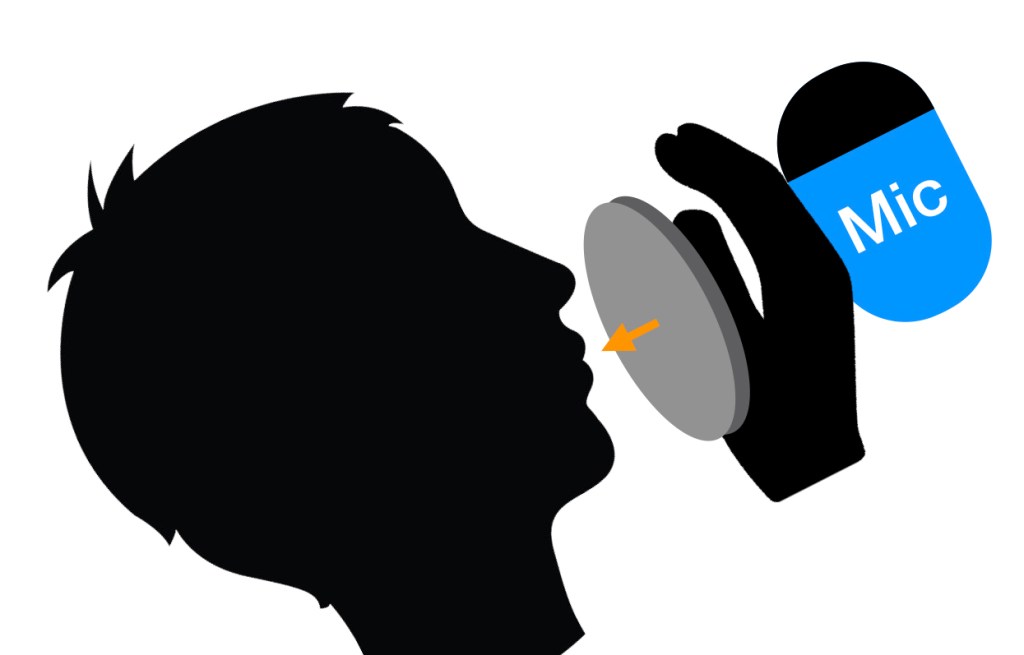
For a stretched cloth or metal screen style pop shield, place the pop shield between the microphone and mouth. Place the back of your hand on the front of the microphone, and behind the pop shield. Then gently blow through the shield. Then move the pop shield away from your microphone and hand, toward your mouth, until you can no longer feel air on your palm. I learned this adjustment technique from Gary Terzza of VO Master Class. Read more about preventing plosives.
Some pop shields are more efficient at stopping air from reaching the mic than others. If you have to move your pop shield too far from your mic for it to diffuse the air, consider getting a more effective one.
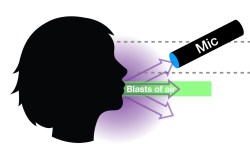
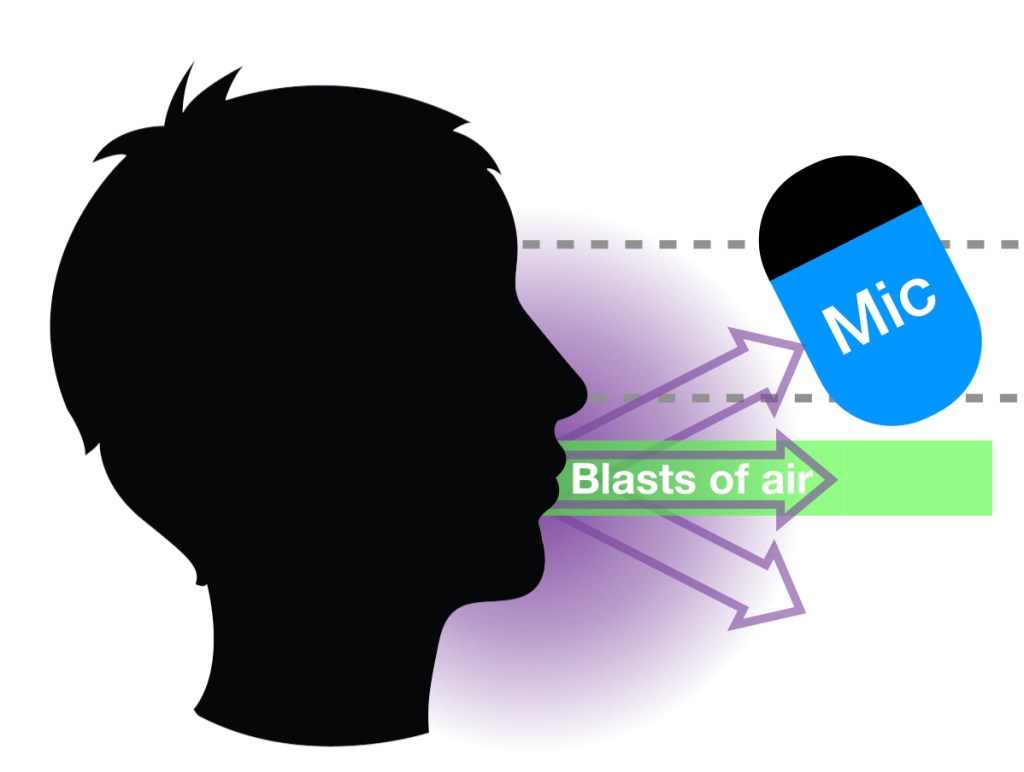
SOUND EMANATES FROM THE MOUTH

Let’s think about what comes out of the performer’s mouth, then position the mic accordingly. Sound emanates directly forward from the mouth, and also up, down, and to the sides. Air blasts from the mouth too, especially when a performer makes hard consonant sounds. Those air blasts are mostly in front of the mouth; not up, down, or to the sides. We want to avoid those air blasts, which do not sound good, while capturing the sound of the voice.

STARTING POSITION
I like to start with the mic positioned above the mouth, with the mic element somewhere between the nose and forehead, and pointed directly at the mouth. Starting above avoids the air blasts and captures the sound of the voice. In addition, placing the mic up high leaves room below for a music stand, script, lead sheet, video monitor, tablet, or other visual tools used during a recording session.
The area to the left and right of the nose, above the mouth and below the eyes is called the Mask. In the same way that the wooden body of an acoustic guitar resonates with the vibrations of guitar strings, the mask resonates with the vocal chords for a richer, more sonorous recording of voice. You instinctively know the mask does this because people sound different when they have nasal congestion from a cold. The mask is an important component of the total sound of a voice. Placing the mic above the mouth helps ensure the mask is well represented in the voice recording.
The chest and neck also resonate with the sound of the vocal chords. Recording the resonant sounds from the chest and neck contribute to a fullness, along with the mouth and mask. Positioning the mic above, pointed down at the mouth, helps include all of these adjacent vibrations, which is why recording from above can sound so natural.
But listen, if recording from below or off to the side sounds better, do it. By all means don’t record from above simply because you designate it as a convention. The location of the mic may be influenced not only by how the voice sounds on mic, but also the physical layout of the recording space. Don’t feel beholden to this mic from above position simply because it’s my starting point. Put that mic where it will do the most good overall.
SIMPLE MISTAKES

I can’t tell you how often the mic is placed above only to have a performer raise their mouth to meet it directly. While that can help open the performers throat and diaphragm, it also blasts air directly at the capsule. Work to keep the element above that blast of air.

I’ve also seen performers move too far away from the capsule. They look straight ahead during mic placement, but then look down toward a script or music on a stand when performing, in which case the mic is aimed at the top of the head instead of the mouth. Work to keep the element pointed directly at the mouth when recording.
Read more about Recording Voice Acting Remotely.
Wondering what kind of headphones you should use to record as a voice actor? Check out my conversation with headphone expert and voice actor Lauren Dragan. I learned so much from her! We talk about the things that help an actor act, sound leaking into your mic, reliable sonic presentation, the relationship between acting for animation and cable length, comfort, the ability to work for several hours, and so much more.
Headphones mentioned in this conversation by name: Sony MDR-7506, AKG K371, Shure SRH840, PSB M4U 2, and Audio Technica ATH-M50x.
01:42 Sony MDR-7506 headphones worn by Lauren, and why she likes them.
03:51 AKG K371 headphones are designed to present as sonically neutral at a relatively affordable price.
04:18 The Harman curve describes a frequency response for headphones that most listeners perceive as neutral. Headphone sound that measures flat in frequency response is not perceived by listeners as neutral sounding.
06:56 Shure SRH840 headphones worn by me, and how I came to choose them.
08:36 What does a voice actor need from headphones? Good isolation, reliable sonic presentation, and a long enough cable.
11:14 Detachable cables make is easier to replace them when they break.
12:46 Detachable cables for higher-end headphones often allow the wearer to choose between a coiled cable, and a flat cable. And because there is a connection point, friction from unplugging and plugging detachable cables can also be a failure point.
16:28 Does it matter how headphones look for voice acting? It might, especially if you’re recoding from home on a video call with your client.
16:51 Pro tip from Lauren… get better isolation from ordinary earbuds using Comply tips.
21:50 Open back and semi-open back headphones are probably not a good choice for voice acting.
23:08 The technique of removing one side of the headphones to hear yourself acoustically, or hear other sounds outside of your headphones.
32:34 Some of our biggest laughs happened in this part of the discussion. Clean headphones to help them last longer. Lauren shares what she learned from a microbiologist about the causes of ear pad deterioration. She also tells us how to clean your headphones, and how to clean common use headphones, such as those found in a recording studio.
36:07 Headphone fit is incredibly important. Firstly, Lauren points out, poor fit can diminish bass response. This could prevent an actor from hearing everything they are recording and misjudge. Secondly, sound leaking out can get on mic, which could be a problem for recording.
38:44 When headphones are too strident or bright, they can make your ears and brain feel tired quickly. This is a major cause of fatigue, making it difficult to work for long periods of time, such as a four hour recording session.
43:54 Like speakers, some headphones cause fatigue more rapidly than others, even if the sound seems balanced and pleasant. Unlike speakers, headphones can trap heat against the listener’s head, contributing to fatigue.
46:42 Consider the clamping force of headphones — how much they squeeze your head to stay in place a province a decent seal. Every aspect of comfort is important for working in headphones for a significant period of time. Keep the packaging and return a new pair of headphones if they do not work for you in terms of fit, fatigue, heat, clamping force, and overall comfort.
48:42 What about noise cancelling headphones, such as the PSB M4U 2? Headphones with noise cancellation are not ideal for voice actors. The tone changes when noise cancellation is activated. A less live reproduction can confuse what the actor is actually hearing. Noise cancellation might also obscure a problem, such as background noise, that is getting on mic, but the actor is less able to notice. Ironically, the best way to use a pair of noise cancelling headphones is with the noise cancellation turned off.
50:26 Wireless headphones, often using Bluetooth, can get delayed by the computer transmitting the audio. The delay is often long enough to confuse the listener. Until our computers are quick enough to minimize that delay, wireless headphones are not a good choice to record voice acting.
51:34 What are some misguided ideas people may have about headphones? Some people assume expensive headphones are always better, which is not necessarily true. High vs low impedance with headphones are not as big an issue as it used to be. There are some suspicious products on the market, but don’t let people sell you snake oil. Big, huge headphones are not always the best, and might keep an actor from moving around the way they need to for a take. “But in the booth you want something simple,” so headphones with a lot of features can actually make the actor’s job unnecessarily complicated.
55:40 When Audiophiles talk about “burn-in” time, Lauren suggests that is much more about getting used to the sound profile of the headphones than any physical change that happens. So spend significant time listening to new headphones to get used to how they sound. This will improve your level of comfort with them. “When you know you’re equipment well, you can record better.”
57:09 “Everyone’s got preferences.” Find some headphones that are right for you. Lauren explains how the Shure SRH840 and Audio Technica ATH M50x headphones sound to her, but notes other people prefer them. The key is to make the connection between what you hear in the headphones and how that sounds in the recording of your voice.
59:03 Contact Lauren Dragan for voice acting, and for her headphone expertise, on Twitter, Instagram, and Facebook. Read her reviews via Wirecutter.com, The New York Times. She is represented by VOX and Go Voices.
Read more about Recording Voice Acting Remotely.
Zoom has quickly become the de factor standard for video meetings. And the audio defaults are great for most uses. But voice actors can make better use of Zoom’s features for their clients by changing a few audio settings.
Kudos to Jordan Reynolds, who got me hip to Zoom audio settings for our conversation about Microphones for Voice Actors at Home.
The first step for optimizing any video call system is to find out how much bandwidth it needs, then run a SpeedTest to find out if you have enough. Zoom requires 2Mbps up and down for video and audio. If everyone shuts off their video, you only need 60-80kbps for audio. If you’ve got too little to support Zoom, consider shutting down bandwidth hogs on your network during your call.
Many users get better results from a wired Ethernet connection than WiFi. If you don’t already have an Ethernet cable running to your Zoom device, you’ll also likely see speed increases for file transfers, streaming, etc. if you connect it by wire.
If you cut down other bandwidth hogs and connect via an Ethernet cable but still have problems getting enough bandwidth for Zoom, you may need to talk to your internet service provider, and/or upgrade your modem or router.
Inside the Zoom application open Preferences. Select Audio in the left panel. On the Mac it looks like this:
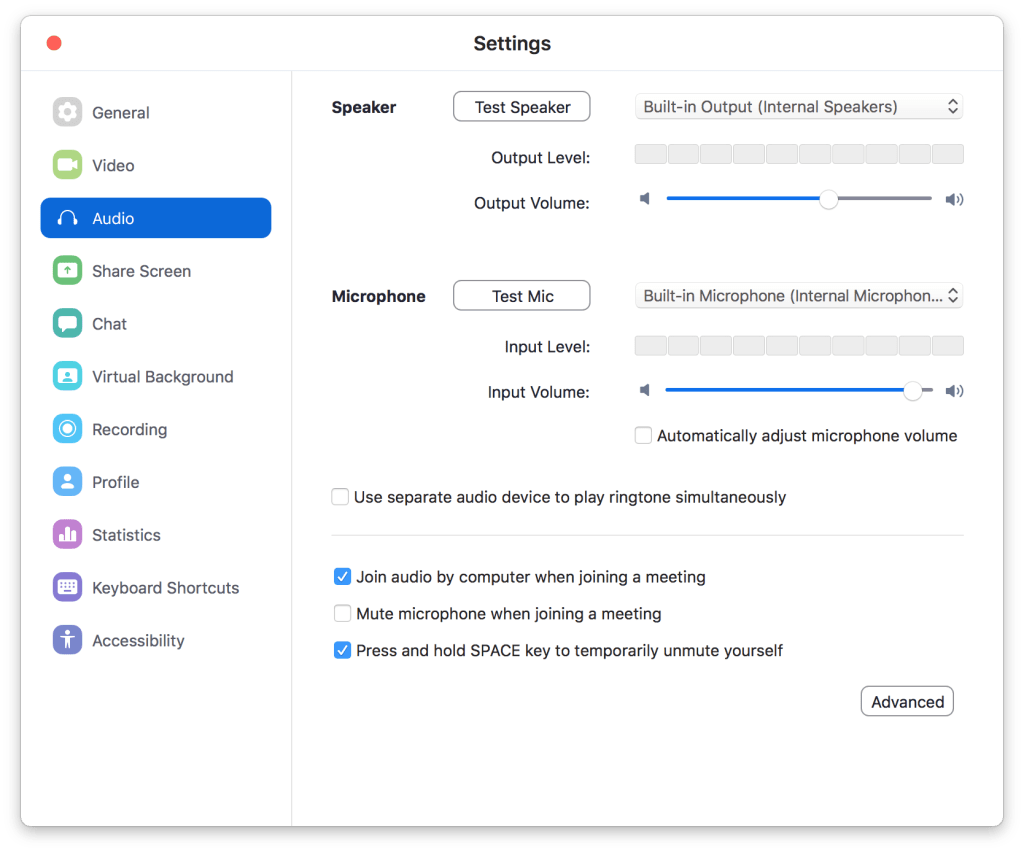
Be sure your audio interface is selected in the Speaker and Microphone pulldowns. Your built-in options aren’t going to sound very good.
This might also be a good time to enable Press and hold SPACE key to temporarily unmute yourself, which I find very handy for voice directing and script supervising. Actors can leave themselves unmuted, while everyone else stays muted during the recording. This option creates a Press to Talk function for everyone else who is muted. Pretty great for remote recording sessions, right?
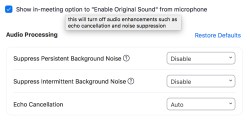
Now click Advanced in the lower right hand corner to bring up these choices:
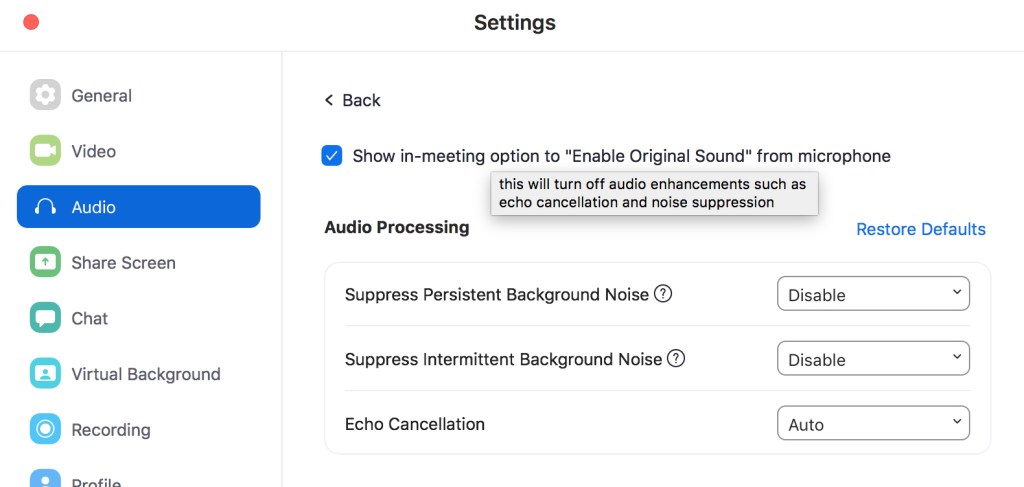
When you rollover the text to Show in-meeting option to “Enable Original Sound” from microphone, you’ll see the floating explanation shown above. Those enhancements are great most of the time, but to allow your voice acting clients to hear as much of what’s actually happening while you record, enable the checkmark.
While you are there go ahead and disable the suppression of persistent and intermittent background noise in those pulldowns. You shouldn’t need these, but they are a nice backstop in case you forget the next step on a call.
With the original sound option now enabled, close out of the Settings dialog box. In your next Zoom meeting you’ll see this in the upper left corner (Mac):
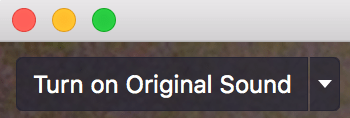
The pulldown to the right gives you some other cool options, but for starters you want to click directly on Turn on Original Sound. When you do, it will toggle to Turn off Original Sound, which is what you want to see. Now listeners can hear you without any additional sound processing from Zoom.
Read more about Recording Voice Acting Remotely.
A conversation with voice actor and home studio ninja Jordan Reynolds. UPDATED May 18
Some guideposts to our conversation:
01:03 Some different situations in which voice actors might be thinking about microphones for recording at home.
03:11 What qualities does a voice actor need from a microphone for recording at home? A well built so it lasts a long time. Low noise floor. Not overly sensitive to plosives. Elsewhere we talk about wanting a mic that captures qualities that are desirable in the actor’s voice, which will vary from person to person. In our discussion of Lewitt microphones and the profile of many shotgun microphones we want to avoid ones that sound harsh, strident, or sibilant on a specific actor’s voice.
05:36 Some of Jordan’s favorite microphones from his personal collection: Neumann TLM 103, Sennheiser 416, Roswell Pro Audio Bravo, and CAD e100 S.
06:43 Discussion about some specific microphone makes and models: Neumann, Townsend Labs, and Lewitt.
10:57 Is a microphone intended for auditions good enough for recording paying jobs? If your current microphone has too much self noise, that might be a reason to get a better mic. You may also want to consider if listing your mic for clients helps your hurts their impression of your professionalism.
14:00 How do USB microphones compare to microphones with an XLR connector? A USB contains 3 things: the mic element with associated electronics, a preamp, and an analog to digital converter. An XLR mic is only the the mic element and associated electronics. A $300 USB mic will need to have a cheaper mic element and electronics to afford also containing the preamp and A/D converter than a $300 mic with an XLR connector.
17:10 How might an expensive microphone be worth the price?
20:00 Should a voice actor own more than one microphone?
20:35 What types of microphones are suitable for a voice actor recording at home: Large diaphragm condenser, small diaphragm condenser (including shotgun microphones), moving-coil, and ribbon? We conclude that a large diaphragm condenser would be appropriate for a first mic, followed by a small diaphragm condenser mic. We specifically talk about what shotgun microphones do well and what challenges they offer. We like moving-coil and ribbon microphones (my voice was recorded on a ribbon mic for this interview), but might be better choices for an additional, rather than primary voice recording mic.
Here’s a great video review, comparison, and discussion from May 10th about microphones for voice acting.
Read more about Recording Voice Acting Remotely.
