
De-Ess
The best approach to sibilance would be changes in mic placement and selection during recording. But if you were not the recordist, you may have inherited someone else’s poor choices and get a voice recording where “S” sounds are painfully harsh. If this happens a few times during a recording, applying EQ to only those instances may be a good solution. But if you have consistent sibilance throughout, manually highlighting and EQing each “S” can be time consuming.
Sometimes we magnify the problem: harshness can be exaggerated by extreme compression, in which case backing off may be helpful. Other times a surgical EQ cut on the entire recording may alleviate sibilance without otherwise damaging the sound of the voice. Maybe an adjustment of compression plus an EQ cut does the trick. Never overlook simple solutions like these. But when a raw voice recording sounds obviously sibilant even before you strap a compressor across the channel, you may need a de-esser.
For a voice recording that is sibilant all the way through, there is typically a dominant frequency where the sibilance peaks. Sometimes an RTA is a quick way to visually find this frequency. You can also sweep the 3-12k Hz region with a narrow Q parametric and listen for the offending frequency. Finding a dominant frequency allows you to use it for triggering a de-esser, and may also be used to focus the processing on the appropriate band if the de-esser is capable.

THE FIRST SHALL BE LAST
De-essing is one of those processes I like to employ early in the chain. The way I figure it, the sibilance volume is probably more consistent before other processing rather than after. For the same reason, whenever I use a gate plug-in I also tend to insert it immediately following the initial cuts. But I know people who’ve suggested just the opposite, so decide for yourself where in the signal path de-essing, gating, or other miscellaneous functions seem effective to you.
TUNED GAIN REDUCTION
One way to learn how something works is by taking it apart and/or building one. At it’s core a de-esser is a compressor with frequency specific controls. So let’s use an EQ plug-in and a separate compression plug-in to make a basic de-esser. We’ll use different plug-ins on each track, so be sure delay compensation is active.
Click to enlarge
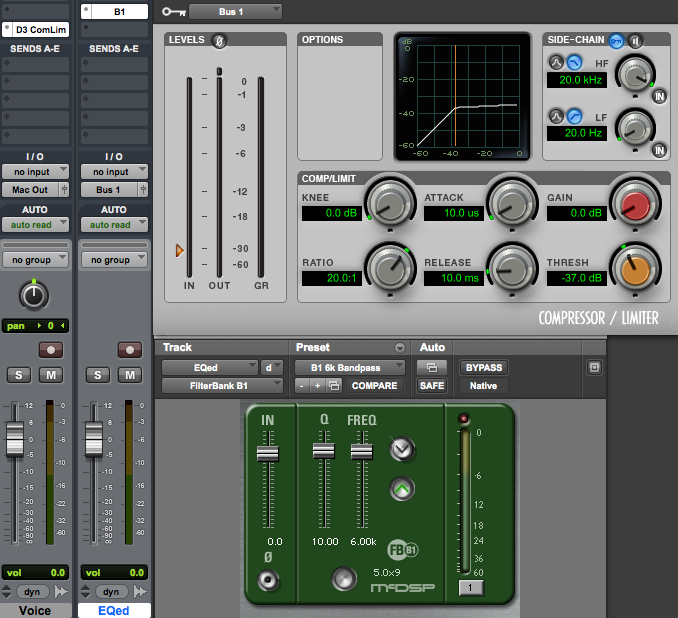
Duplicate the sibilant voice track. Place a compressor with side-chain capability on the first track. Use a narrow bandpass on the second track so that the sibilance is promenant, then buss the output to the side-chain input of the compressor on the first track. Activate the side-chain and set the compressor threshold so that strong sibilance content causes the compressor to clamp down on the voice signal. If the threshold is too high, the sibilance won’t be reduced. If the threshold is too low, the “S” sounds will resemble a lisp; that’s how you know you’ve gone too far. Use quick attack and release times to help keep the compression out of the non-sibilant parts of the signal. A high ratio usually works well.
Congratulations! You just built your own de-esser. Notice a few things:
(1) Gain reduction should be driven by a fairly narrow bandwidth that is “tuned” to the sibilance.
(2) The threshold must be significant enough to reduce some sibilance without sounding lisp-like.
(3) The EQ is not applied to the signal, only the side-chain. So the full bandwidth signal gets reduced when the compressor triggers. Sometimes the quick attack and release settings are not enough to prevent other sounds from being compressed too.
HIGH FREQ GAIN REDUCTION
As we have seen, sometimes broadband compression will affect non-sibilance. Let’s consider a more focused version of the de-esser in an attempt to improve performance. This time we separate the high frequencies and subject them only to compression.
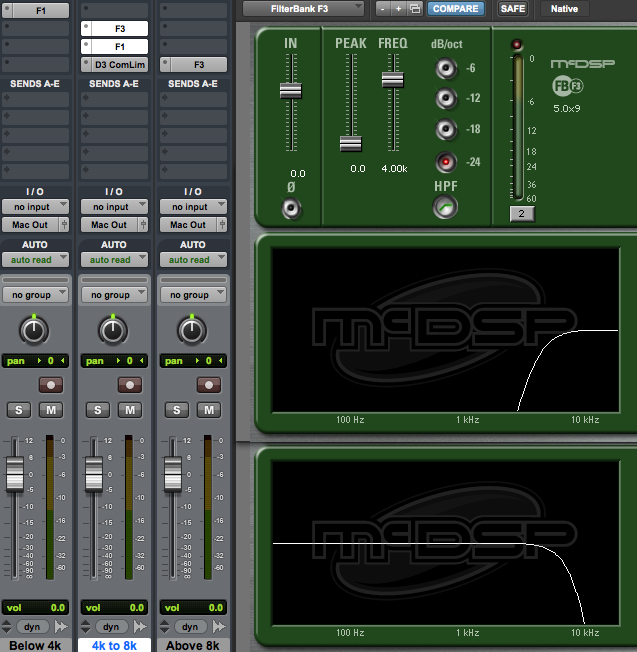
Start again with only one vocal track. Make two duplicates; three tracks total. On the first track use a high pass (low rolloff) filter. Set the frequency just below where the sibilance dominates. For example, if the harsh “S” sounds are centered at 6k Hz, then set the high pass on your first track to 4k or 5k Hz. Add a side-chain compressor after the EQ.
On the second track use a low pass (high rolloff) set to the same frequency as track one. This will be the part of the voice that the de-esser does not touch.
On the third track setup your band pass filter, centered on the sibilance. Feed the output of the third track to the side-chain input of the compressor on the first track.

Click to enlarge
This de-esser is a little more complicated, but narrows the focus of the gain reduction. It provides the opportunity to sound more natural. The threshold setting is still important: too little compression and the sibilance will remain, too much and the lisp-like sound results. Many of the de-essers that you can purchase function like this.
BAND PASS GAIN REDUCTION
So far both of our DIY de-essers use a bandpass filter to drive the side-chain of a compressor. What if we wanted to compress only that band of sibilance and leave everything below and above it alone? Here’s how to built it:
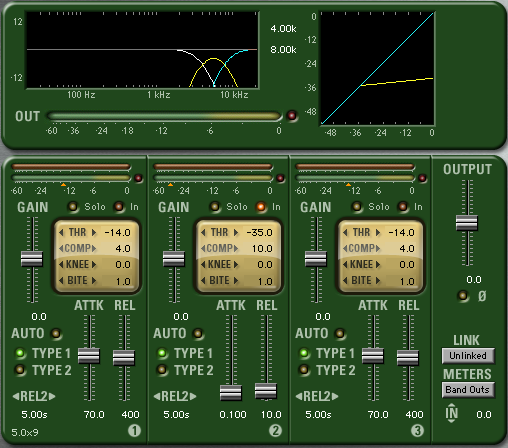
Start again with only one vocal track. Make two duplicates. Slap a low pass filter (high rolloff) on the first track. This will be all of the voice below the sibilance that we leave alone.
On the second track use a high pass filter set to the same frequency as the first track. Add a low pass filter above it. The low pass and high pass filters combine to make a band pass filter. These two frequencies should be set for the lower and upper limits of the sibilance range that you want to diminish. Now add a compressor. Since the input of the compressor is the sibilance, no need to use a side-chain input. Just compress the sibilance and leave the rest alone.
The third track will need a high pass filter set for the same frequency as the low pass filter on the second track. This will be all of the voice above sibilance that we leave alone.
Click to enlarge
I think it’s worth building all three tracks to really understand how the parts work together to de-ess. Some of the better de-essing processors available for purchase have a similar band pass option.
But now that we’ve built the whole thing, let’s take a short cut with a multi-band compressor. If you simply insert the multi-band compressor on a single track of voice, then define one band’s lower and upper limits like we did the second track above – boom! You’ve essentially created the same de-essing process with a lot less fuss. Leave the other bands inactive and you will only process the sibilance. Most multi-band compressors have presets for de-essing and they could be a good starting point when you’re trying to manage sibilance.
LISTEN
Many dedicated de-essers have a “listen” function that allows you to tune around and listen to the strength of the signal used to activate the gain reduction. This saves time because once you find the harshness, you’ve simultaneously set your de-esser to use it. It can also be more intuitive than looking at an RTA or sweeping and listening to a parametric EQ.
DE-ESSER KUNG FU
The trickiest de-esser I know was originally built into the Empirical Labs Lil Freq, then got it’s own half rack called the DerrEsser. What makes this processor unique is that it not only reacts to the strength of the tuned sibilance band, but it compares it to the audio out of band. All other de-essers can misfire if a signal is simply very loud. If the sibilance band happens to be strong because everything is strong, the threshold may be crossed and the de-esser activates even though there may be no sibilance. The Empirical Labs processor compares the sibilance band to the rest of the signal. If everything is loud, then the relationship of the sibilance band to the rest of the signal is relatively flat. But if a harsh “S” sound comes through, the strength of the sibilance band will be much louder than the rest of the signal. This helps the processor activate only in the presence of sibilance and avoid misfiring any other time. It’s very cleaver and one of the best sounding de-essers I have ever used. The only problem is: both the Lil Freq and DerrEsser and completely analog, so there is no plugin option.
I’ve drawn some pretty elaborate schemes on the backs of envelopes to make my own version of this processor for use In The Box, but had a difficult time using it. The interplay of component parts is complicated. So kudos to Empirical Labs for making a great sounding product, with a simple-to-use interface that’s difficult recreate. I’m holding my breath that they make a digital version (I’ve suggested it to them at trade shows).
A SHOCKINGLY SIMPLE DIY DE-ESSER
De-esser function is complex, so I decided to save this technique for the end of the article. Because this version is so incredibly simple, it doesn’t break down the process as well. But it’s super fun and anyone with the most basic EQ and compressor can build it. Plus, it can also provide some insights into voice processing chains more generally. Ready? It’s goes like this:
Parametric EQ boost of sibilant frequency range > compressor > reciprocal cut of the boost

Click to enlarge
There is only one channel and you don’t need a side-chain! Yes, this is a functional de-esser and it works. Try it for yourself. Astute observers will point out weaknesses of this design:
(1) Ridiculously strong EQ levels must be used to avoid misfires.
(2) Even the highest quality digital EQ used this severely will probably impart undesirable sonic artifacts.
But now consider a variation on this theme. Take the case of a recording that is sibilant and kind of bright overall. Normally you might decide that a modest EQ cut at the sibilant frequency sounds better than a constantly misfiring de-esser. But if you are also using a compressor on that bright recording, you might want to cut the sibilance after compression because that compressor might dynamically help you manage the harshness (especially if your attack and release times are quick). Or you might intentionally choose a bright microphone to recording someone sibilant, let a compressor react to the harshness, then balance out the brightness with some EQ cuts after compression.
You’re probably better off planning for a good recording than a bright, sibilant one, but you never know when an offbeat idea like this might come in handy. The interplay of EQ and dynamics processors is at the heart of every de-esser, so thinking about them in a larger context of component parts in a signal chain can help us use them more effectively.
All of my screen shots are from ProTools, because that’s what I use. To see examples with other software, and de-esser perspectives from other audio craftsmen, check out:
Jon Tidey – Audio Geek Zine – examples in Reaper
Jon demonstrates four different approaches including screen shots and audio examples.
Joe Gilder – Home Studio Corner – examples in Studio One
Watch and listen to this video where Joe configures a multi-band compressor as a de-esser, and adjusts settings based on what he’s hearing.
Also in this Voice Processing series:
Frequency Cuts
Compression Effects
Compression Technique
Frequency Boosts
Extreme EQ!
Limiting
9 Comments
Leave a CommentTrackbacks
- How to Create a DeEsser [Video] | Home Studio Corner
- Voice Processing – Limiting | Randy Coppinger
- Voice Processing – Extreme EQ | Randy Coppinger
- Voice Processing – Boosts | Randy Coppinger
- Voice Processing – Compression Techniques | Randy Coppinger
- Voice Processing – Cuts | Randy Coppinger
- The Complete Guide to Vocal Processing: EQ
- Voice Processing – Compression Effects | Randy Coppinger

I find it helpful when tutorials break down complex processes into simpler steps.