
A conversation with voice actor and home studio ninja Jordan Reynolds. UPDATED May 18
Some guideposts to our conversation:
01:03 Some different situations in which voice actors might be thinking about microphones for recording at home.
03:11 What qualities does a voice actor need from a microphone for recording at home? A well built so it lasts a long time. Low noise floor. Not overly sensitive to plosives. Elsewhere we talk about wanting a mic that captures qualities that are desirable in the actor’s voice, which will vary from person to person. In our discussion of Lewitt microphones and the profile of many shotgun microphones we want to avoid ones that sound harsh, strident, or sibilant on a specific actor’s voice.
05:36 Some of Jordan’s favorite microphones from his personal collection: Neumann TLM 103, Sennheiser 416, Roswell Pro Audio Bravo, and CAD e100 S.
06:43 Discussion about some specific microphone makes and models: Neumann, Townsend Labs, and Lewitt.
10:57 Is a microphone intended for auditions good enough for recording paying jobs? If your current microphone has too much self noise, that might be a reason to get a better mic. You may also want to consider if listing your mic for clients helps your hurts their impression of your professionalism.
14:00 How do USB microphones compare to microphones with an XLR connector? A USB contains 3 things: the mic element with associated electronics, a preamp, and an analog to digital converter. An XLR mic is only the the mic element and associated electronics. A $300 USB mic will need to have a cheaper mic element and electronics to afford also containing the preamp and A/D converter than a $300 mic with an XLR connector.
17:10 How might an expensive microphone be worth the price?
20:00 Should a voice actor own more than one microphone?
20:35 What types of microphones are suitable for a voice actor recording at home: Large diaphragm condenser, small diaphragm condenser (including shotgun microphones), moving-coil, and ribbon? We conclude that a large diaphragm condenser would be appropriate for a first mic, followed by a small diaphragm condenser mic. We specifically talk about what shotgun microphones do well and what challenges they offer. We like moving-coil and ribbon microphones (my voice was recorded on a ribbon mic for this interview), but might be better choices for an additional, rather than primary voice recording mic.
Here’s a great video review, comparison, and discussion from May 10th about microphones for voice acting.
Read more about Recording Voice Acting Remotely.
What’s the best way for voice actors to work with voice directors, producers, and others when recording remotely? Here are some options to consider.
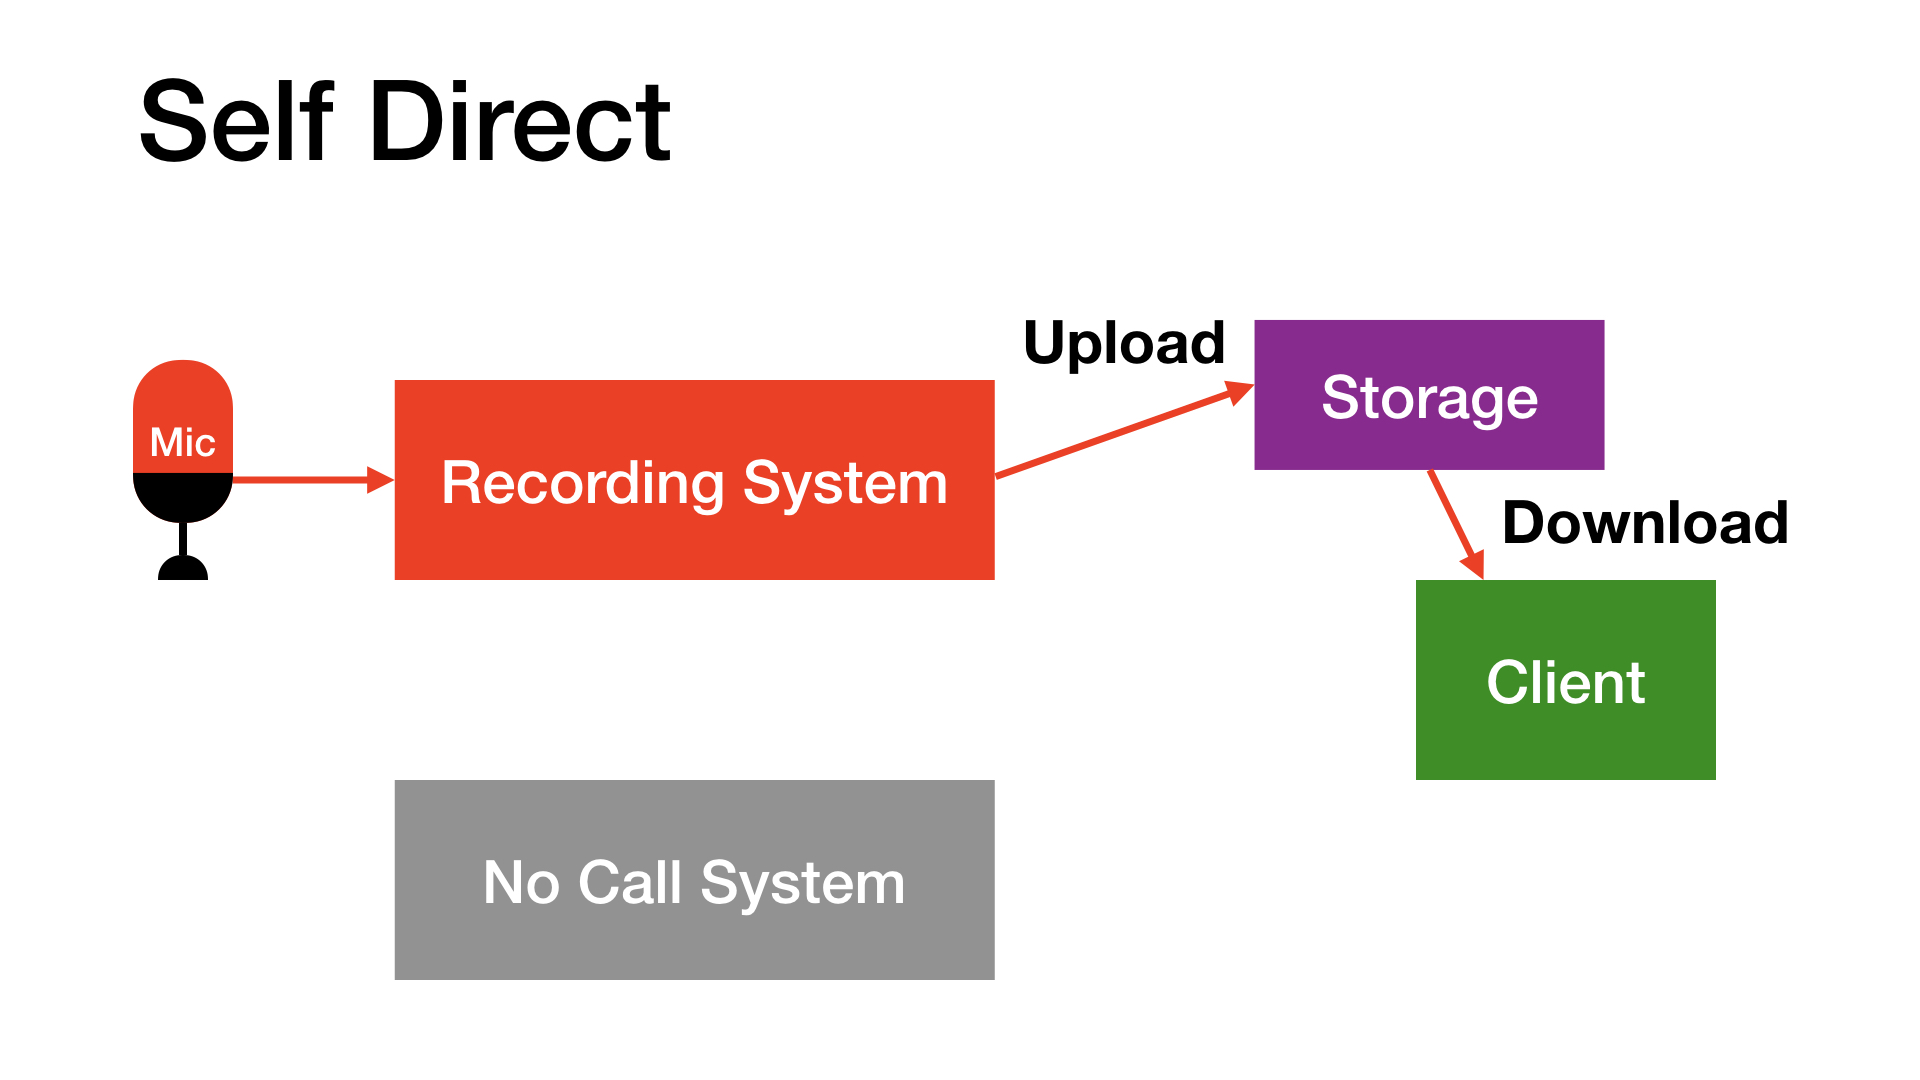
Self Direct. No one actually connects with you live while you’re recording. The actor directs oneself, sends the recordings, and gets feedback afterward for any pickups. This frees the actor to work at a time of their choosing, and wait for a passing plane. There is no call, so the actor can focus on acting and recording.
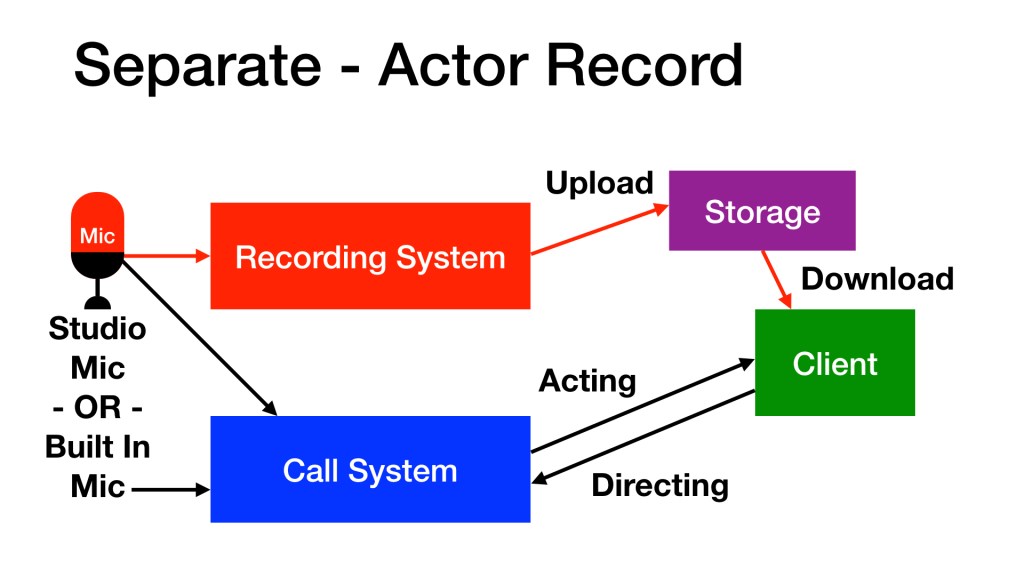
Separate. The system used to record, and the system used for the call are not integrated. The production team attends virtually by phone, Skype, Zoom, etc. but the recording system simply records without being connected to the call directly. The most simple version of this is: the actor holds a phone next to their face while performing into their microphone and recording on their computer. Why keep them separate? It can be relatively simple to setup, and if something goes wrong technically the actor only has to concentrate on the one that’s problematic: the recorder, or the call.
Some producers prefer to receive the audio in a full bandwidth format, such as WAV, recorded by the voice actor. In this case the focus is audio fidelity.
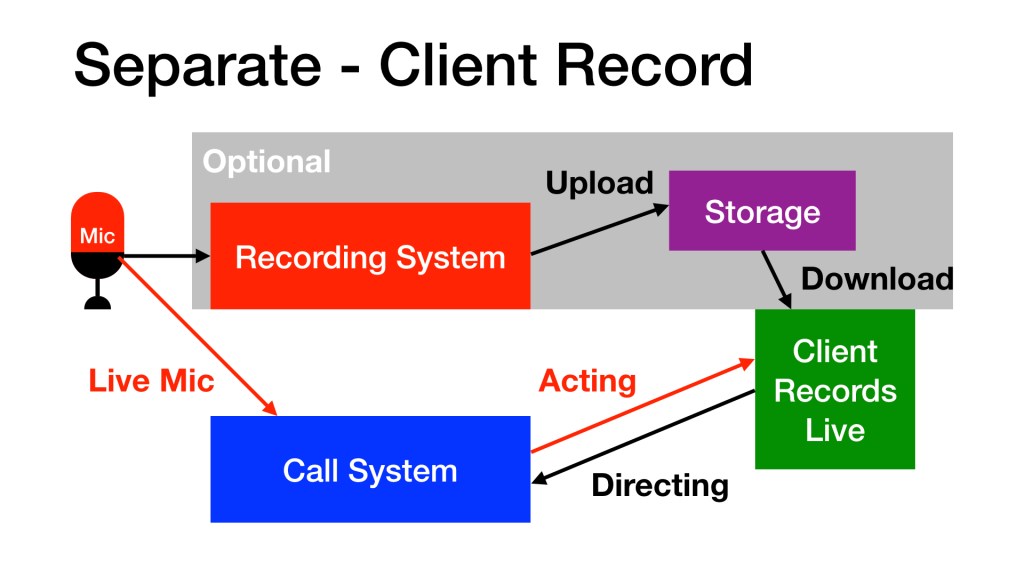
Others prefer to record the audio directly thru the call system. Skipping the upload and recording directly is quicker, which is important for tight turnarounds. Only a few call systems sound good enough to use directly, including Bodalgo Call, Audio Movers, and various flavors of Source-Connect. This approach turns the call system into the recording path.
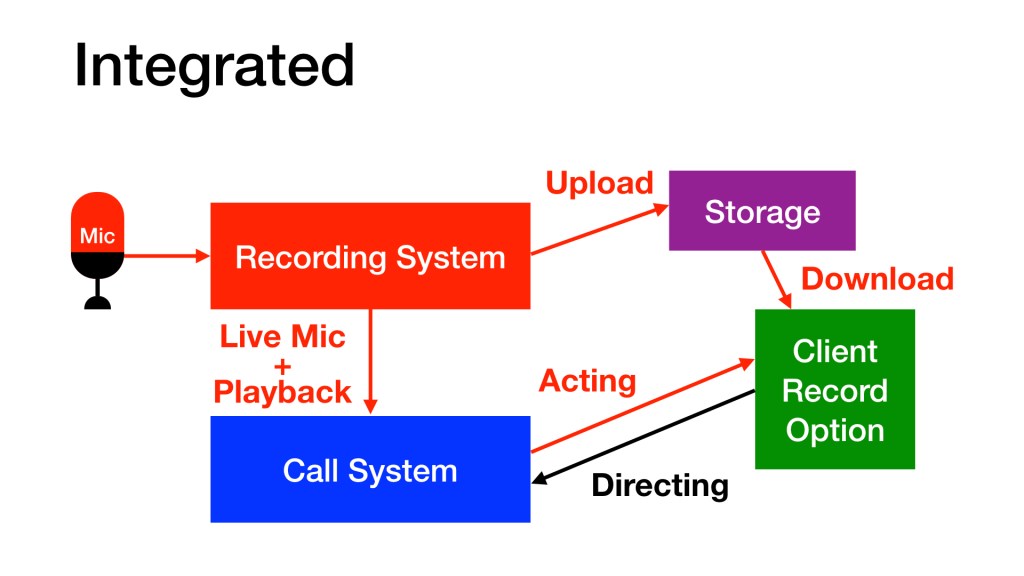
Integrated. The system used to record is connected to the call. When the actor speaks into their recording microphone, the production folks hear the audio from the same microphone. Setting this up isn’t as simple as the options above, but it does offer some important advantages. (1) If there is distortion or a plosive on mic, the production folks hear it and can ask for a retake based on that tech problem. (2) If the production folks want to hear a take after it is recorded, the actor can play directly out of their recording software into the call. (3) It can simplify communication during the call; no holding a phone off to the side with your hand the whole time, no second mic to address, etc.
Read more about Recording Voice Acting Remotely.

What do purpose built recording spaces do so well that we may want to emulate acoustically at home? I hear these in three categories:
- Sound Isolation – Keeping outside sounds outside
- Internal Sound Reflections – Room echo, room reverb, and room resonances
- Background Noise – Inside noises that get picked up by microphones
I’m going to be super honest here: there isn’t much we can do for free about #1, Sound Isolation. Sorry. Now if the neighbors have a noisy dog and it doesn’t sound as loud on the other side of the house, recording in the quieter side is free. If you can ask the neighbors to keep the dog quiet and inside for a few hours while you record, you aren’t spending any money either. Unless you bribe the neighbors. Or the dog.
Voice actors have long used the Fortress of Blankets and Pillows for recording auditions at home. Because it works! Journalists recording from home know this too. Most things that are soft and fluffy to the touch are also good frictional sound absorbers, which help minimize Internal Sound Reflections (#2). But if you’re recording for hours at a time, or if you’re recording with a webcam pointed at you the whole time, you might want more than Fort Blankets.
Choose a room. The first free option to consider is which room at your home sounds better? Typically, smaller rooms with a lot of reflective surfaces, such as bathrooms, do not sound great acoustically (except for shower singing). Record you self in several different rooms, listen to your recordings, and decide which rooms sound better. There may be trade offs here, such as not wanting to setup your gear where you sleep, or being closer inside your home to the neighbor’s noisy dog, or picking up the sound of the refrigerator, etc.
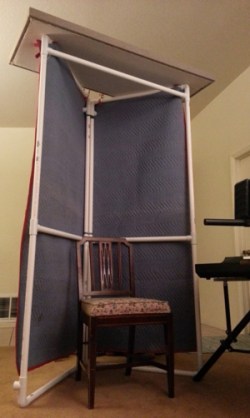
Empty rooms sound terrible. Remember how awful the rooms of your home sounded when they were bare? But after moving in furniture, hanging pictures, and otherwise filling them with stuff, things sounded better? Do more of that. Bring soft, absorptive things into your recording space — the bigger the better. Hang more pictures, bring in some house plants, setup some bookshelves, and generally break up the sound as it bounces around inside your recording space. You can close drapes and blinds while you record to reduce sound reflections from glass windows. If there’s a closet full of clothes, leave the closet door open. Cloth tapestries hung on the walls sound fantastic! While it isn’t free, I built a very effective and portable recording booth at a very low cost using furniture pads (heavy blankets) that I already owned and some PVC from the hardware store.
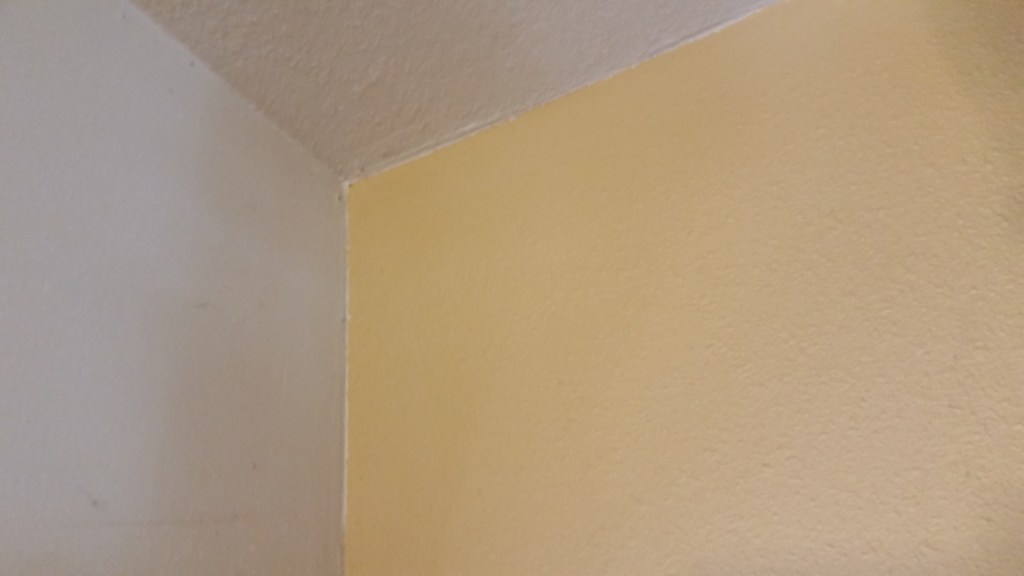
Place your mic where is sounds better. Once you select a good sounding room and fill it with stuff, try recording yourself in different parts of the room. You will probably find that recording inches away from walls, the floor, or the ceiling doesn’t sound very good. The corners where these boundaries meet are typically worse sounding places to locate a microphone. Mirrors, desktops, and any large, sound reflective surface will tend to sound worse than placing your mic at a distance from these. But somewhat confusingly, sometimes the dead center of the room will present a room resonance to your mic. Resonance is when your voice stops but the sound of the room reflections continue to vibrate at a specific frequency in your voice. Moving the mic just a few inches can effectively dodge these resonances. So record yourself in different locations and decide where to place your mic based on which locations sound better.
Addressing #3 Background Noise is a bit like #1: most of the free options are not convenient. If your air conditioner makes noise that’s getting into your recordings, turn it off when you record. Any other noise makers that can be shut off, go ahead and turn them off too. Or put them in another room. You probably don’t want to turn off or move your refrigerator, in which case record in a different room. They key here is to listen to the sounds in your home that you usually ignore. Be aware which sounds are getting in your recordings and take steps to record without them.
If you have a sound booth in your home as your recording space, congratulations! You have potentially addressed all 3 acoustical issues at once — though certainly not for free. Nevertheless a booth can still have acoustical problems, especially resonance because of how small they are inside. As above, bring some soft, fluffy stuff inside. And be sure to try different positions for your microphone. Listen to how the sound of your recordings changes when you do, and keep improving the way things sound without spending any more money.
When you’ve exhausted these free resources, and if you’re still unhappy with the acoustics of your space that are getting in your recordings, consider purchasing acoustical treatment, and working with folks who can help evaluate your setup so you can spend your money well.
Happy home recording! Read more about Recording Voice Acting Remotely.
With everyone isolating themselves from Covid-19 to protect others from spreading the virus, many of us need to record voice acting remotely.
UPDATED Sept 17
Voice actors with equipment at home, what can you do to make your audio sound as professional as possible?
Take control of the sound you present to your clients by Optimizing Zoom for Remote Voice Acting.
Build your own DIY Recording Booth.
Free Acoustical Improvements for Recording at Home.
How to Minimize Plosives (P-Pops) on mic.
Should I buy a new microphone? A conversation with actor Jordan Reynolds about Microphones for Voice Acting at Home.
What qualities does a voice actor need in headphones? A conversation with actor and headphone expert Lauren Dragon: Headphones for Voice Acting.
Dee Bradley Baker’s tips and resources for Your Home Studio.
What technology do we need to conduct a live recording session with a voice director? How can we best use it to deliver professional quality dialog?
Where should you place your microphone? Tips on Microphone Mosition for Voice Recording.
How to connect actors with voice directors, producers and others for Remote Voice Direction.
Directed Voiceover Sessions With What Online Platform? By actor Rebecca Haugh
Better listening in your home studio with DIY Speaker Isolation.
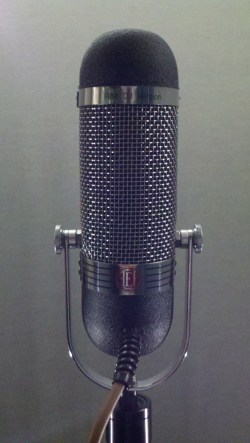
The first time I used a figure-8 (or bi-directional) microphone I wasn’t choosing the pattern so much as a microphone that happened to also exhibit the pattern: a ribbon microphone. I loved the sound of the mic, but I wasn’t accustomed to the back side picking up sound with the same sensitivity as the front.
I suspect I’m not the only one who initially considered this a consequence rather than a feature. And because I was focused on the tonal quality instead of the pickup pattern, it seemed like a trade-off between a sound I wanted and a pattern that was unfamiliar to me.
Many sessions later, I not only learned how to better use a figure-8 ribbon, I started finding advantages to the pattern, even when I wasn’t using a ribbon microphone. One of the keys to favoring figure-8 was the realization that equal front and rear sensitivity includes rejection everywhere else. Remember: figure-8 rejects sounds 90 degrees off-axis. That means to the left and the right of the microphone, and it also means above and below. So while the shape of the pickup looks like the number 8, the shape of the rejection looks like a donut!
Here are some reasons to intentionally choose the figure-8 pattern:
1. Face-To-Face Interview
Do you want to hear two people talking to each other while rejecting all other sound above, below, and to the sides of them? Put a microphone with a figure-8 pattern between them! One mic, two people, fantastic isolation. This works best when both mouths are on-axis with each side of the microphone, and their speaking volumes are similar (as opposed to one who speaks loudly, another who speaks quietly). Typically these people are not right up on the microphone (or each other), but a bit further away, for a relaxed conversation with a comfortable distance between them.
2. Reject Off-Axis Sound
When recording symphonic music, harp can go missing in the main array. But a cardioid spot mic on harp often gets as much brass as the main array. A figure-8 microphone, set about as high as the player’s head, pointing straight down at the soundboard works great. Why? Because the side of the mic rejects the most in figure-8. Point the side of the mic toward the brass section! The back of the mic is sensitive, but it points straight up, which is typically the flyway space for curtains, flats, lights, etc. on a live performance stage. You get a lot of harp from the font of the mic, and some distant room from the rear of the mic. With clever positioning this trick works with non-harp sound sources too.
3. Tight Pickup
The on-axis sensitivity, both front and back, is tighter with figure-8 than any other directional pattern. Point a figure-8 at sources while listening to the output of the mic using headphones. It’s like pointing a laser. You’ve got to be clever to point the rear of the microphone at something else you want to record, or minimize what the rear lobe “hears” by pointing it at something acoustically absorbent, or very far away. The figure-8 pattern can help you isolate something specific because the on-axis response is so narrow.
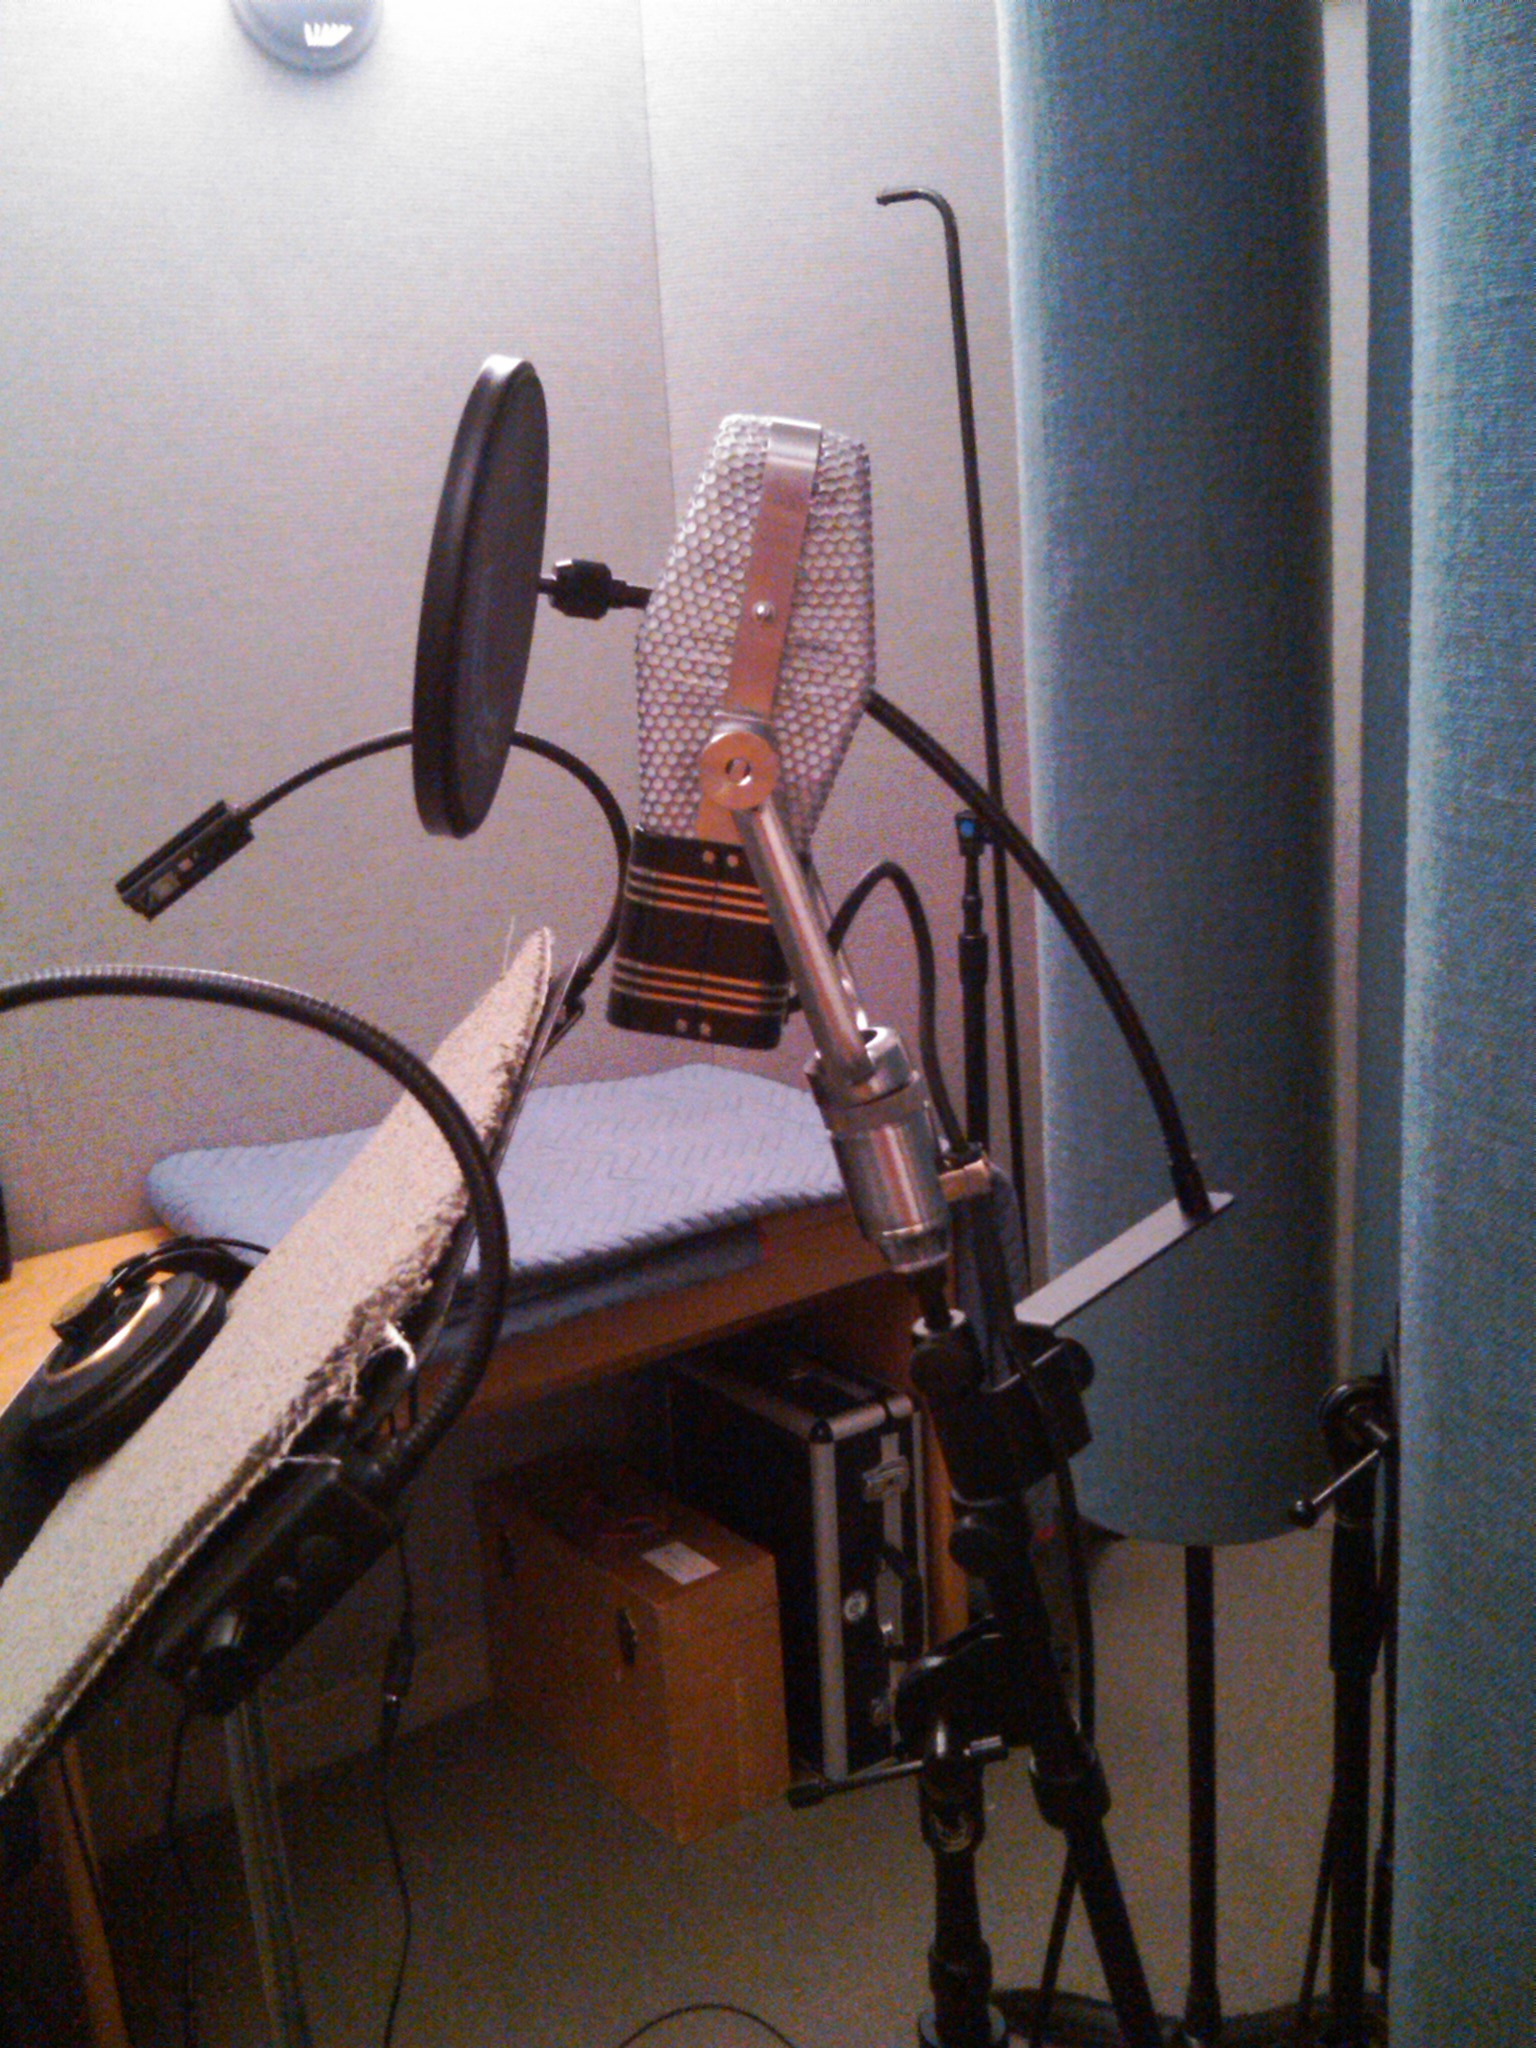
AEA 44cx with baffle behind
4. Intentionally Capture a Mixture of Direct and Reflected Sound
If the space in which you are recording sounds good, capturing some of it can enhance the recording. Reverb or simpler reflections are sometimes included in a recording using the omni-directional pattern, but it will also work with a figure-8 pattern. If you want more of the room acoustics, move the mic away from the source. If you want less room, move the mic closer to the source and/or point the rear of the pattern toward a less reflective part of the room.
5. Room / Ambience Microphone
Anytime you have direct sound in a room mic, you create a possibility for artificial sounding Comb-Filtering. Remember the donut shaped sound rejection pattern of the figure-8? That comes in super handy for isolating reflected sound from the direct sound. So aim the sound-rejecting 90 degree off-axis part of the figure-8 pattern toward the primary sound source and you can isolate it from the reflected sounds captured by the on-axis front and rear lobes. Tip: Consider if you want the lobes to point at reflecting surfaces that are equidistant to the front and back, or not. If they are similarly reflective (both flat plaster, for example) the delay of the two reflections and the volume of the two reflections will be heard similarly. As you move away from reflective surfaces the sound takes longer to reach the mic, and the reflection gets quieter in the mic. The opposite is true for a lobe of the pattern moving closer to a reflective surface. And this is true for any room microphone pattern, but often more important to consider because sound enters with the same intensity into opposite sides of the same figure-8 element.
6. Stereo Recording with Mid-Side, or Blumlein
These two incredibly flexible stereo recording techniques are built around the figure-8 microphone pattern. Most stereo mic setups force you to decide how wide the stereo image should be before you start recording. Mid-Side and Blumlein can be adjusted in post. So if you misjudged in the field, these techniques give you some opportunity to tweak later for a better result.
So far I’ve avoided mentioning that the rear lobe has opposite polarity to the front lobe of the figure-8. Both lobes have the same sensitivity, but the rear lobe has a negative polarity. It seems appropriate to mention here because the opposing polarity of the two sides allows figure-8 mic users to represent both sides of a spacious audio presentation as stereo from a single “Side” channel when anchored against the “Middle” mic channel. It’s a neat trick developed from some of the earliest days of stereo recording theory.
While often touted as Mono Compatible, my mentor Dave Appelt suggested that it might be more accurate to call Mid-Side: Mono Destructive. Because when you collapse a Mid-Side recording to mono by panning L and R to the middle, the Side signal cancels itself. In other words, all sounds that were in the Side part of the recording are no longer there. That’s not necessarily a bad thing, just a more honest way to evaluate the manner in which Mid-Side collapses to mono.
Recording with the Mid-Side Microphone Configuration
By contrast, all sources in both elements of a Blumlein recording continue to be audible when you collapse it to mono by panning L and R to the middle. These two signals are truly Mono Compatible because nothing perfectly cancels as you pan in; it simply gets more and more narrow without the audible Comb-Filter effects that are sometimes a problem with spaced-pair and near-coincident stereo microphone techniques.
Much more could be said about Mid-Side stereo, including a decent tutorial, and Blumlein stereo too. I plan to write more about them in future posts.
See also
Unidirectional Ribbon Microhones
Beyond Figure-8 Ribbon Microphones
The $60,000 Ribbon Mic Shootout from RecordingHacks
What Is Blumlein Technique from Audio Engineering Associates, including audible examples

I can’t hold a candle to the stories and reporting that will follow the passing of this legend. But I feel compelled to join the chorus of people who were profoundly impacted by her. She was an amazing actor and pioneer. The opportunity to work with her allowed me to sit at the feet of a master.
Rest in peace.
—
It was her good friend, director Chuck Jones who said, “June Foray is not the female Mel Blanc. Mel Blanc is the male June Foray.”
Behind the Voice Actors
http://www.behindthevoiceactors.com/June-Foray/
“When I was fortunate enough to attend the Oscar nominees’ luncheon in 2007, I asked director Martin Scorsese who he was excited to have met that day, among the hundred-or-so contenders and Academy guests. He smiled and said, ‘June Foray.’”
http://variety.com/2017/tv/people-news/june-foray-dead-dies-rocky-natasha-bullwinkle-1202508180/
“a very scrappy, ballsy lady. Somebody who could definitely walk into a room full of wisecrackin’, three-martini-lunch, dudes in 1950-whatever or 1960-whatever, and hold her own.”
http://www.avclub.com/article/rip-legendary-voice-actress-june-foray-258658
June Foray, the famed “first lady of voice actors”
http://www.hollywoodreporter.com/news/june-foray-dead-rocky-flying-792600
http://heavy.com/entertainment/2017/07/june-foray-death-voices-rocky-movies-tv-shows/
Years ago I had the opportunity to work on a session with legendary percussionist Emil Richards. He came to the studio to record for a film score. He had all kinds of crazy instruments that he brought and played for the various music cues. The most memorable for me looked like an ice cream cart with a marimba on top, called a Flapamba.
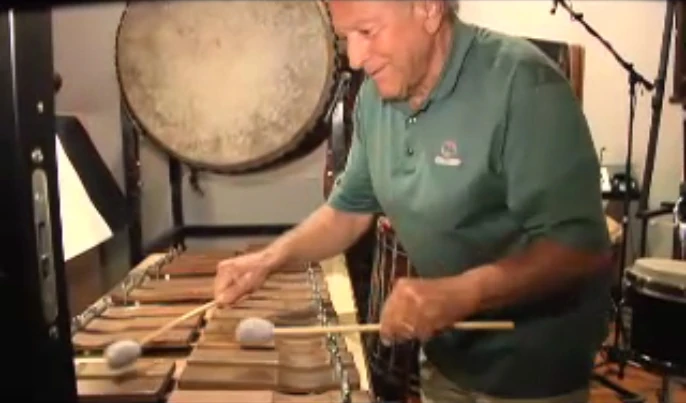
Once we started recording the Flapamba, a discussion began in the control room about a squeaking sound that could be heard every time he played a certain note. There was a loose nail in one of the bars, and depending on the angle of his strike, it would squeak against that loose nail. Sometimes the squeak was loud and obvious, other times it was less noticeable. We concluded that once a listener heard it obviously, they would be distracted, listening for it the rest of the time. In between takes Emil was kindly notified that the Flapamba was making this occasional noise and asked what he might be willing to do about it. He answered that he was not going to fix the problem, that in his opinion, it should have that audible squeak.
This response caused some cognitive dissonance. We figured he didn’t notice the noise, and asked him to fix it reluctantly because we didn’t want to cast doubt on his ability to hear what he was doing. But for him to say that he not only heard it, but also wasn’t going to do anything to get rid of it, that was very confusing. So someone was bold enough to ask him why he wanted that squeak to remain. He replied, “That’s how you know it’s not a keyboard.”
I began to think through this idea, that keeping the flaw helped reveal the authenticity of the instrument. We didn’t hire a keyboard player, we hired a percussionist, and then asked him to play the score on acoustic instruments. For Emil, that squeaky note was sonic proof that listeners were getting a real, acoustic Flapamba.
There have been times since that session when I have identified some aspect of a project as undesirable. On my better days, I remember Emil’s words and ask myself if the current “squeak” might be tied to the authenticity of the performance, story, etc. Sometimes I can find my way past perfection to accept something I initially wanted to remove as a necessary part of what helped make the whole. A few times, I have come around to the idea that the very thing I wanted to eliminate is actually the best part. That’s what I call The Flapamba Principle: an intentional embrace of flaws to make things better.
The current President of the Audio Engineering Society, Alex U. Case, has invited members to share their memories of conventions past. Here’s one of my favorites.
Graham Blyth performed pipe organ in one of the big cathedrals in San Fransisco, as he has for so many years as part of AES Conventions. Ron Stretcher held a class before the concert on techniques for recording that pipe organ, including a Decca Tree. He asked those of us attending if anyone knew how to assemble his AEA Decca Tree. I had just purchased one and assembled it a few times, so I raised my hand. And I was the only person who raised a hand.
So there I was assembling Ron’s microphone positioner in front of the entire class, and though I might have been nervous about it, instead had fun putting it together. After everything was setup and ready, our class was invited to sit in the choir seats right underneath the front organ registers. As if that listening perspective of the glorious music wasn’t enough, I was just a few seats away from audio luminaries Wes Dooley and Rupert Neve. I thought to myself: THIS is why I am a member of the AES.
Here’s a pic of my Decca Tree
for a different recording situation.


Are you going to be in Los Angeles for the 141st Convention of the Audio Engineering Society?
Let’s meet in person!
Thr, Sep 29
12:30pm UPDATED
Bring your lunch, or just hang
West Hall Groundwork eating area, near West Exhibit Hall entrance
3:30pm
We might talk about microphones. A little bit.
South Hall Exhibit Area
Booth 406 – Roswell Audio & Microphone Parts
Fri, Sep 30
10:30am UPDATED
Seems like a good time for caffeinated beverages
West Hall Groundwork eating area, near West Exhibit Hall entrance
12:30pm
Buy your lunch, or just hang
El Cholo – 1037 S. Flower Street (walking distance from Convention Center)
See you there friends.
On the occasion of Erin publishing her e-book about how to get started in voice acting, I took the opportunity to talk shop and glean some wisdom from my very talented friend.
I asked Erin:
(1) How did you decide to create an e-book?
“There was a license plate in front of me that said, “write.'”
“I thought it would be a pamphlet… with some links. That’s how it started.”
“This one afternoon I sat down to start putting this pamphlet together – it poured out of me.”
“It’s written the way I talk, so it’s very conversational.”
“Even if you don’t like my opinion, or my stories, or any of the advice I give, just the links alone with be worth their weight in gold.”
(2) When you work with others — producers, directors, engineers, other actors — what can they do that really helps you act? What things make it more difficult?
“I mention in the book how important a good engineer and director are…”
“The best engineer: you don’t even notice they’re doing their job.”
“When I’ve become a character, there’s a flow…”
“If I’m blessed enough to be with other people in the room, which always makes it more honest for me; my acting always goes up to a much more real place when other actors are in the room. It’s a huge blessing.”
“A really is engineer is so intuitive, that they’re three steps ahead of me, and I don’t even know where I’m going!”
“The director says, ‘Did you catch that? And the engineer’s like, “Of course.'”
“The directors, the engineers, the other actors – everybody adds. I can’t speak for other people, but my acting gets better when there’s a beautiful team of people who are working together and each one of them have the permission to use all of their intuition, to use all of their talents and their strengths. And then we never have to pay attention to the weaknesses. We don’t have to because everybody compliments each other.”
(3) Tell us about recording ensemble.
“My favorite is prelay when we’re all in the room together. There’s no question. Or if I’m doing a videogame and I’m not going to get to have other people in the room, a video game where I’m not being pushed to deliver a hundred lines per hour, a videogame where the director, and the writer, and the producer in the room and we’re playing, and we’re really discovering a performance.”
“So to get the performance that you would get with another person in the room we have to do something more creative in order to really create the pacing, the flow, and that rhythm. So, that’s a real gift when that happens.”
“Things come up that would never come up one-on-one.”
(4) Who inspires you?
“I live in Los Angeles surrounded by the best talent in the world.”
“I love artists.”
“I love reading comic books…”
“I have to use my imagination. My eyes are closed most of the time. My imagery all comes from the inside because very rarely is the product already finished that I can look at it.”
“I like to go to art shows and just soak that in. And I feel like that helps build my inner universe.”
“I was a big fan of Emily Carr when I was younger.”
“There’s a great artist: Brian Ball… his artwork is so stunning.”
(5) What’s your favorite thing about being an actor?
(6) When you’re asked to create a character, what kinds of things do you want to know?
(7) What’s your favorite trick, tip, or secret weapon?
(8) If you could travel through time to have dinner with any historical figure, who would it be? And which of your roles would most likely delight that historical figure?
