
Mic #3 is a TransformerLess Microphone: the Neumann TLM-170 R. There is a lot to like about this microphone, notably: a wide selection of polar patterns, nearly flat frequency response through all of the patterns, and a max dB SPL of 154 (padded). Ron Streicher and others especially like the TLM-170 to record choir.
Here’s an unobscured pic of the microphone’s back along with a few other views. Click any image to enlarge.


Follow this WordPress blog, or via Twitter or Facebook to to guess all of the microphones in this series.
Explore Neumann microphones (English).
Index to the whole Name That Mic series.
This time we have a solid state condenser featuring a transformerless output. It’s a large diaphragm condenser. I removed the model number from the pic, normally just below the pattern selector. Do you recognize this mic?

Follow this WordPress blog, or via Twitter or Facebook to find out if you were right, and try to guess all of the microphones in this series.
Audio Engineering Associates builds their AEA R84 ribbon microphone in Pasadena, California. To me, this mic makes anything sound tasty and vintage. Here’s the pic of the mic again without any blur effect to disguise it. Click to enlarge.

Follow this WordPress blog, or via Twitter or Facebook to to guess all of the microphones in this series.
Explore Audio Engineering Associates ribbon microphones.
Index to the whole Name That Mic series.

Yes, the ubiquitous Neumann u87 was the correct answer to Name That Mic #1. The microphone supports three polar patterns: omni, cardioid, and bidirectional. There’s a low rolloff (that doesn’t sound very good), and a -10dB pad (that doesn’t sound very good). Stephen Paul told me that a u87 likes to see a transformer input. I thought he was full of crap, but I’ve learned from experience he was right: a microphone preamp with a transformer input tends to sound better than a transformerless input on this mic. Sure, a u87 costs a lot of money, but it sounds good on almost anything.
Enjoy some more glamour shots of the u87. Click any image to enlarge.


Hear this microphone in action: Neumann u87 vs. Studio Projects, Neumann u87 vs. Gefell UMT 70, Stephanie Sheh AT5040 / U87 Mic Comparison
Follow this WordPress blog, or via Twitter or Facebook to to guess all of the microphones in this series.
Explore Neumann microphones (English).
Index to the whole Name That Mic series.
In November of 2011 a good time was had guessing audio gear based on pics of the VU meters, so I thought this holiday break it might be fun to guess microphones. Let’s start with a classic workhorse mic: a large diaphragm, solid state condenser that almost anyone would be glad to own. Click on any thumbnail for a larger view.


Follow this WordPress blog, or via Twitter or Facebook to confirm your guess, see more pics of this mic, and try to guess all of the microphones in this series.
Mic #1 Answer ->
Index to the whole Name That Mic series.
Air travel can be taxing. The sonic gauntlet of shuttles, airports, and planes can test the endurance of anyone who otherwise enjoys listening. Here are a few thoughts to save your ears and sanity.
Earplugs
Perhaps too obvious, but how often do you remember to take them with you? More importantly, how much of your travel day do you wear them? The ride to/from the airport, the wait at the airport, and all of the time on the plane are opportunities to dim the ambient noise. Announcements at the airport and on the plane seem especially loud to me, so I am sure to be wearing plugs for those. The calm I experience from something as simple as earplugs is wonderful.
 Flush!
One of the loudest sounds I encounter when flying is the flush of the airplane toilet (although bus brakes are probably louder). I make a point to close my ears for that flush, either by wearing plugs or just using my fingers.
Headphones
A lot of people like noise cancellation headphones, which work quite well. Personally, I prefer a decent pair of closed back headphones. Anything that sounds good and provides you with some reasonable isolation will do the trick. They can be very handy if your plane features unhappy, pre-talkers. It can also be a quick way to let overly talkative neighbors know that you are not interested in conversation.
Charge
Have all of your devices and batteries charged before you leave. You won’t get through that movie/game/album/podcast if you run out of juice.
Water
Good health brings good hearing. Planes are very dry and the simple act of breathing on a plane can really take the moisture out of you. Force yourself to drink some water, especially near the end of the trip (when you can anticipate plentiful bathrooms).
See also: Shure vs Sony headphones, a pinboard of headphones
Got a pinboard for articles like this? 
![]()
It has become tradition to help my friend, Dr. Lincoln Hanks, record the Christmas Concert at Pepperdine University. This year I was able to use one of my favorite techniques for placing a microphone inside piano.
The student orchestra played in front of a live audience. Christmas trimmings decorated the front of the stage (making it easier to hide mic cables). I was concerned about softer instruments getting lost in the main array. That’s why we put spot mikes on harp, first contrabass, and piano.
The mic technique for a solo piano usually tries to represent the full range of the instrument, often in stereo. But the spot mic was intended to help boost the level of the piano when it was too soft in the main array.
The lid was placed on the short stick. On the long stick, or without a lid at all, there is a lot more spill, making it difficult to raise the volume of the piano without raising the level of those other instruments too. Closing it down helped with isolation, but also posed a threat: a piano lid is an excellent reflector. Too often, a mic inside a piano sounds comb filtered and weird because of the reflections, especially on the short stick. But if you place a mic ON that boundary, you eliminate the reflection off of the lid AND get a 6dB level boost for being in the “pressure zone.”
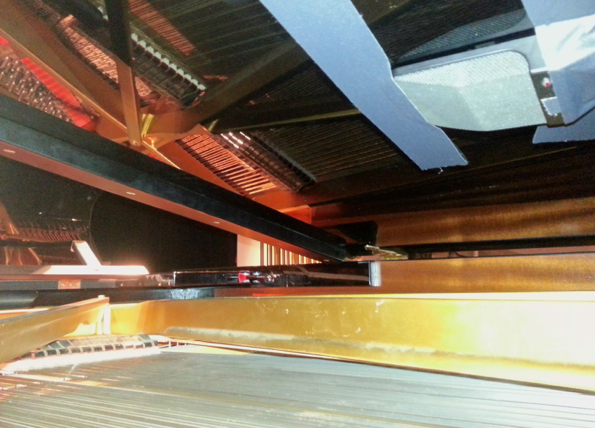
I used plenty of gaffer’s tape to secure my Crown PCC 170-SW to the underside of the lid. The element was supercardioid — actually half supercardioid with the mic against the boundary. I aimed the mic toward the hammers.
Have a listen to this passage of Concert Suite from The Polar Express. First we hear the main array only, then the raw piano spot mic in isolation, then a mix of the two. The spot mic was EQed, panned and delayed in the mix.
It’s worth noting that the gaffer’s tape left residue under the piano lid. It wasn’t easy to clean up, so check with the piano owner before you muck up the finish.
See also: 2011 Christmas Concert, YouTube: How To Record Piano, Basics
Got a pinboard for articles like this one? Cool- 
![]()
I always learn something when I watch someone record, edit, mix, or otherwise work with audio. I love “Wait! How did you do that?” moments in the studio. But here’s a little trick I discovered by mistake. Apparently I had too much blood in my caffeine system the day I accidentally pressed Control-Option-Command-[.
Before (left): Waveforms extend past the top and bottom of the tracks.

After (right): Waveforms fit inside the upper and lower boundaries of the tracks.
Being able to null the waveform zoom height is significant to me for at least two reasons:
(1) A reference point helps keep perspective.
(2) At the null height (or smaller) the crew cut of digital clipping or over-limiting can be seen.
I shared my joy with the internets and was rewarded with two more quick view changes by Julius Mauranen (@juliusmauranen). The first one is obtained by using Option-A.
Before (left): Work area shows a limited view of the timeline left to right.

After (right): The entire length of the timeline fits in the Edit window from left to right.
The key combo for this view change is Control-Option-Command-Up Arrow.
Before (left): The height of individual tracks prevents seeing all of them.

After (right): All tracks are visible in the Edit window from top to bottom.
Got a pinboard for articles like this one? Cool- 
![]()
I recently became aware of Maslow’s Hammer, an idea first suggested by Kaplan:
“Give a small boy a hammer, and he will find that everything he encounters needs pounding.”
The image of the non-stop hammering little boy made me grin. It also got me thinking about the consequences of having powerful tools, especially the ones we wield intuitively. Have any of my favorite toys become a crutch? Am I applying this technology because it improves things, or simply because it’s handy?
 At first I offered myself this challenge: As I encounter my work, how might my perception change if I hold a different tool? This could mean any kind of tool — plugins, templates, workflows, collaborators, platforms, OS, etc. But I think Maslow’s Hammer is less about simply swapping implements and more about thinking beyond the tools. The greater challenge is probably: Can I strip away the obvious methods that individual tools enable and imagine better ways to work?
Let’s take a practical example. Audio folks have been known to ask, “Which is better for recording and mixing music: ProTools or Logic?” A comparison of features usually follows. Instead of focusing on better ways to work, we get bogged down in which product has superior “hammering” ability. Don’t let the technology dictate how to get it done. Sometimes we need to back away from the toolbox and exercise some lateral thinking. Consider end results and new paths for reaching those goals first, then choose appropriate implements to enable the good work imagined.
See Noise Jockey’s follow-up to this article: How Tools Shape Our Creations
Got a pinboard for articles like this one? Cool- 
![]()
